support hotline
0577-57572522
First, the function
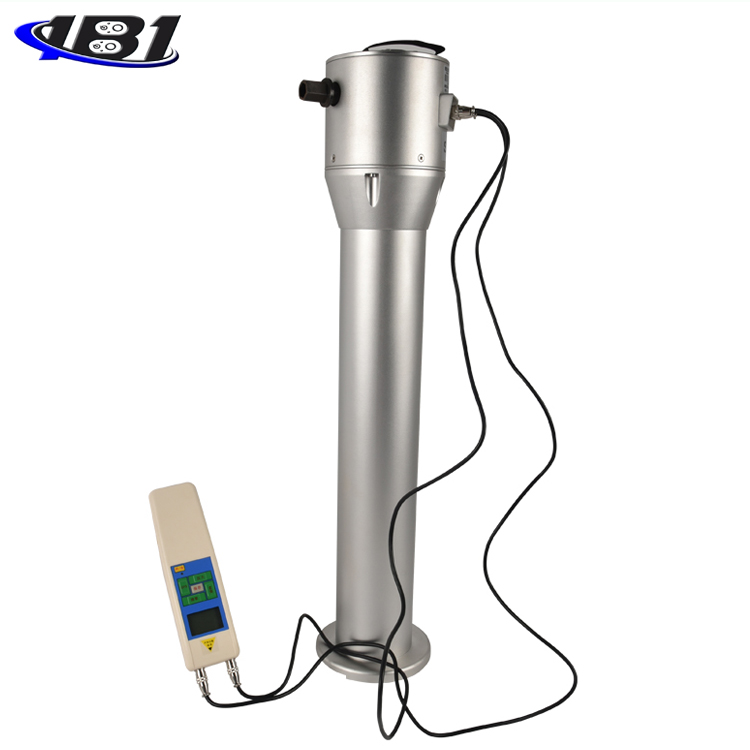
EJSD digital soil compaction measuring instrument is also called soil solidity and hardness measuring instrument. It can be used to measure soil compaction in the field. Built-in GPS positioning and depth measurement system can simultaneously display soil compaction, measuring depth and Geographical location, the soil compaction curve of each measurement point can be automatically generated after being connected with the computer, and the regional soil compaction distribution map can be generated from multiple measurement points, and the relevant data link can be automatically generated. Tight soil can prevent the infiltration of water, reduce the utilization of chemical fertilizers, affect the growth of plant roots, and reduce crop yield. Therefore, it is particularly important to know the compactness of the soil, and this instrument can better guide agricultural production and highway construction.
Features
1. Portable in the field, high precision and high resolution, with the characteristics of simple operation, full functions and convenient carrying.
2. It can directly measure soil compaction. Built-in GPS positioning and depth measurement system can display the position information (latitude and longitude) of the measurement point to measure depth and soil compaction, and can store the data of each sample during the measurement to the host All data of up to 200 measuring points can be stored on the system.
3, with data upload function: use RS232 interface to connect with the computer, the software can automatically generate the soil compaction curve of each measurement point and regional soil compaction distribution maps can be generated from multiple measurement points and automatically generate related data links . The software has storage and printing functions.
4. It has the function of automatically grasping the peak value of soil compactness and backlight, environmental protection, and automatic shutdown function. (Without operating the monitor button, the monitor will automatically turn off after 10 minutes).
4. Resolution: 0.1Kpa;
5. Accuracy: ± 1%;
6. Operating temperature: -10 ℃ ~ 60 ℃
7. Output interface: RS 232 (nine-hole socket).
8. Power supply: rechargeable battery, charger (charging voltage 100V ~ 240 V)
9. Operating temperature: -10 ℃ ~ + 60 ℃;
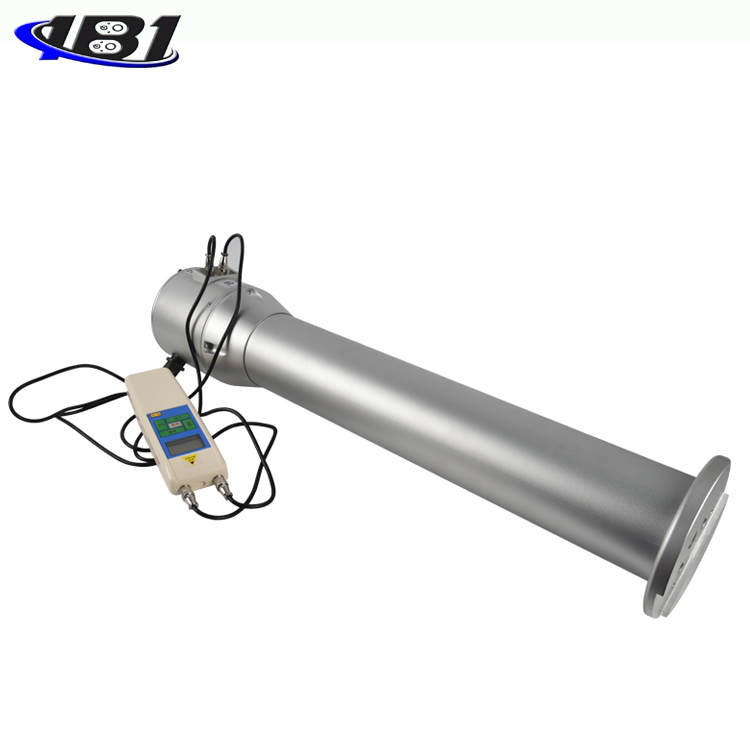
10. Dimensions: outer diameter 140mm × height 750mm
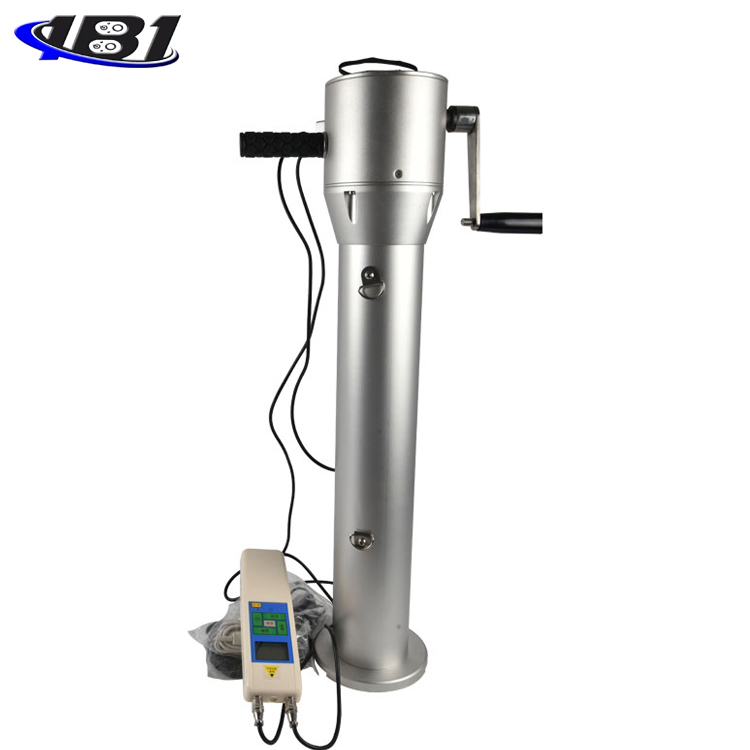
Product schematic diagram

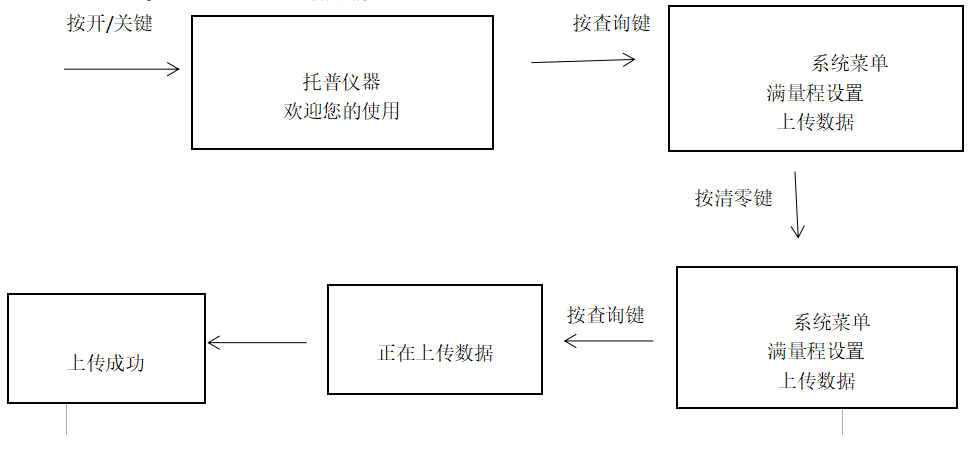
Fourth, the display panel

Six, key description
1. On / off key: can be used to turn on and off.
2. GPS key: Display the current longitude, latitude and time.
3. Pressure key: Display the current measured soil pressure and depth.
4.Save key
a. Press this key in the measurement state to save the current measurement with different depths.
Pressure value, longitude, latitude, time, and storage serial number.
b. Press this key in the query status to view the previous record.
5.Zero key
a. In the measurement state, press this key to clear the current measurement force value (including: water potential peak
Value force value, water force value).
b. Press and hold this key in the query status to delete all stored records
c. Press this key in the query state and no backlight display, the back-off function will be turned on.
d. Press this key in the system menu state to cycle through each menu in turn.
6.Query key
a. In the measurement state, press this key to view the last record (and the record corresponding to the last depth).
b. In the query state, press this key to view the record of the pressure value corresponding to the previous depth.
c. Press this key in the welcome interface to enter the system menu.
d. Press this key in the system menu state to enter the current menu item.
User operation instructions
1. Operation steps and storage method for pressure measurement
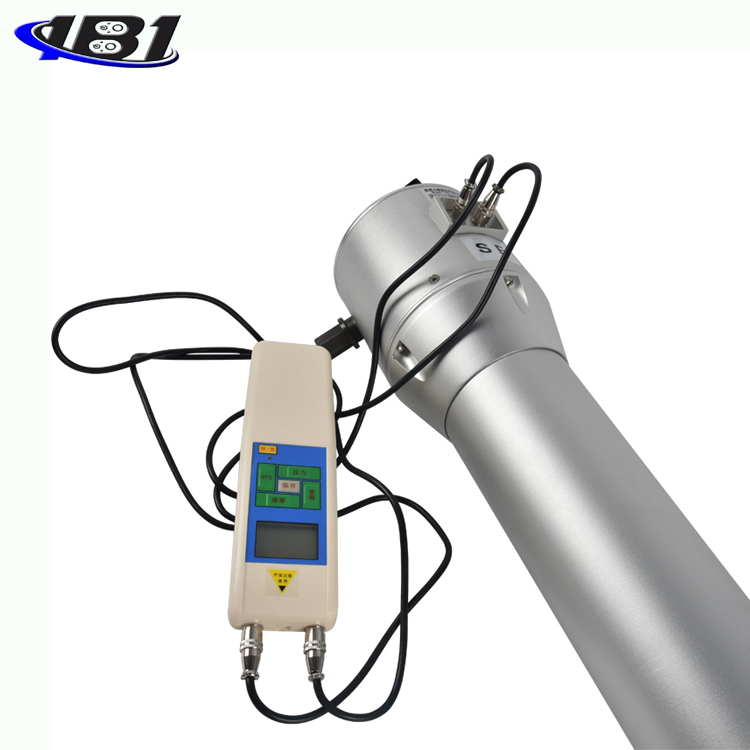
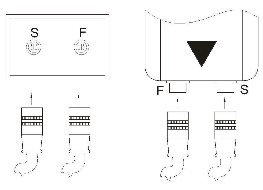
a. Make sure that the display is connected to the sensor, and its \"F\" indication represents the force value (so-called sensor connector). Combined with the next step, as shown below:
b. Make sure that the data line of the displacement indicator is plugged into the display and connected, and its \"S\" indication represents displacement (also known as the sensor connector). Combined with the previous step, as shown below:
c. Turn on the power switch, display the manufacturer information and welcome to enter the user's main interface.

d. If the data is not zero, press the zero key.
e. According to soil measurement depth requirements, rotate the measurement handle smoothly and uniformly to the required depth
Press the save key to save the measurement data. (During measurement, the measured soil pressure and depth can be displayed in real time.
Degree of technical parameters. )
2. Query the saved data (when the data has been saved)
3, latitude and longitude (real time) view on the main interface of the display user
★ 4. Full-scale setting: The user is not allowed to use this setting.
5. Upload data
a. Connect the display and computer with R232 data cable first (as shown below):
b. Computer software operation steps
First open the box, find out the CD-ROM in the attachment, read it in the CD-ROM drive, double-click the file
This icon in.
c. Press the steps to operate the meter again.
d. At the same time as the previous operation, the computer software will pop up a dialog box. In this dialog box,
Fill in this data name and click OK.
6. Computer software operation method
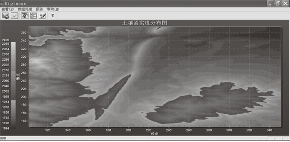
a, view the distribution map: click the toolbar \"distribution map \" icon, the display effect is as follows:
b. The test data import operation is the same as the previous step:
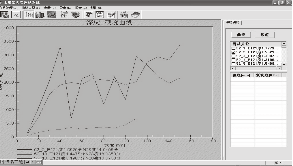
① 、 View the imported data: Click on the toolbar \"Curve \" icon to pop up \"Data
Source \"dialog box, select the data you want to view under the file name column and click OK.
② Under the test position column on the right, select the one you want to display (or display at the same time)
Show multiple) data.
③ After selecting the data under the test position column, click the curve, and in the display window area
Display the curve of the data (if you click the value, the saved data will be displayed under the depth and compactness column.
Value).
c. The export operation of test data is as the previous operation method:
① 、 Double-click the blank area of the display window area, and pop up\"Deep hardness curve customization ...\"
Dialog box, click Output at the bottom right of the dialog box.
② Select the required type in the dialog box of\"Output depth hardness curve\" and click
Output can be done (including printing, data report export, and curve image operations in this dialog box).
Eight, matters needing attention, maintenance and repair
1. Please use the matching charger to charge, otherwise it will cause circuit failure and even cause
Fire.
2. When the power button is pressed and there is no display, it means that the battery is dead and needs to be recharged.
3. Do not use a power source other than the rated voltage of the charger, otherwise it may cause electricity
Fire or fire.
4. Do not knock on the LCD screen and place objects on the LCD screen.
5. Do not press the function keys with nails, sharp objects or pointed objects.
6. Handle gently during use and handling.
7. Do not disassemble, repair or modify the machine yourself. These actions may cause the instrument to be permanently
Sexual failure.
8. If any trouble occurs, please contact the place of purchase or the company.
9. This product has no damage during normal use and appearance within one month from the date of sale.
In the event of product quality problems, the customer will need the original sales invoice, a valid warranty card and a complete
Packed to the original place of purchase or our company replaced the product of the same specification model, after the replacement
The product extends the warranty period and terms of the original product.
10. Within one year from the date of sale of this product, under normal use, non-human
The fault is covered by the warranty (the user disassembles the machine or repairs at other service points.
Warranty), the customer can contact the original place of purchase with the original sales invoice and a valid warranty card to get this
The company has one year free warranty.
11.The warranty terms of this product only apply to EJSD sold in the Chinese market
Series products. For products that exceed the replacement period and warranty period, customers can check with the original purchase office.
Inquire about maintenance or contact the company, the company will provide paid maintenance.
Nine, packing list
Dear Customer:
Hello! Thank you very much for choosing our company's digital soil compaction measuring instrument.
Please check whether the accessories are complete when buying.
|
Serial number |
Name |
Number |
|
1 |
Measuring instrument |
1 set |
|
2 |
Foot pedal |
1 piece |
|
3 |
Aviation wiring |
2 pieces |
|
4 |
handle |
1 |
|
5 |
Rubber band |
1 |
|
6 |
Shake handle |
1 |
|
7 |
strap |
1 |
|
8 |
Computer cable RS232 |
1 |
|
9 |
Phillips flat head screws M5 |
8 pieces |
|
10 |
Charger (9V big head) |
1 |
|
11 |
Supporting software CD |
1 |
|
12 |
user's manual |
1 serving |
|
13 |
Inspection certificate |
1 serving |
|
14 |
Certificate of conformity and warranty card |
1 piece |