support hotline
0577-57572522

Thank you for purchasing the EY-4 Series Digital Fruit Hardness Tester:
The fruit hardness tester has the advantages of high accuracy, easy operation and convenient carrying. It also has various test modes, which are convenient for testers to use, and can store and input test data to the computer for statistical analysis. And can be used in conjunction with a special test bench to improve measurement accuracy.
Special Note:
There are many specifications for EY series fruit hardness testers for users to choose. Users can choose the corresponding specifications of the instrument according to the force value of the product to be tested. The scientific measurement range is from 10% to 100% of full scale. The metrology department recommends not to use less than 1% of full scale.
I. Features:
1.1 With high precision and high resolution: large screen LCD display, with backlight function (backlight suitable for night use), and with screen digital forward and reverse function;
1.2 With battery capacity display: divided into 3 grids, 2 grids and 1 grid, the instrument will automatically shut down when the battery is too low;
1.3 With gravity acceleration setting function: users can enter the precise value of gravity acceleration of the place of use by themselves, making the test more accurate;
1.4 With peak hold function: keep the peak display until it is manually cleared;
1.5 With automatic peak function: automatically release the peak value after 10 seconds;
1.6 With large memory storage function: can store 447 test values;
1.7 With data output function: data can be input to the computer through the data line for various analyses;
1.8 With automatic shutdown time setting: The automatic shutdown time setting can be set to automatically shut down from 10 minutes to 90 minutes; 10 minutes of automatic shutdown without operation, 10 minutes is the default, you can set the automatic shutdown to the required automatic shutdown time, automatically When the shutdown is set to 0, it will not automatically shut down.
1.9 With high-quality charging power supply: the charging voltage is available from 100V to 240V, which can be adapted to most areas at home and abroad;
1.10 has 2 sets of installation dimensions: it is suitable for most test machines at home and abroad, which is convenient for users to install on the machine
Technical parameters:
2.1 Model: EY-4;
2.2 Unit: Kg / cm2 (× 105 Pa);
2.3 Indenter diameter: 1 #: Φ11.1mm, 2 #: 7.9mm
2.4 Measuring range: 1 #: 0.2 ~ 15 Kg / cm2 (× 105 Pa), 2 #: 0.4 ~ 30 Kg / cm2 (× 105 Pa);
2.5 division value: 0.01 Kg / cm2
2.6 Indication error: ± 0.5%;
2.7 Accuracy: ± 1%;
2.8 Indentation depth: 10mm;
2.9 Power source: Charging power source: 220V / AC; Battery continuous working time: 8-10 hours;
2.10 Power supply mode: No. 5 nickel-cyanide battery pack / 220V AC charging 4 ~ 6 hours
2.11 Stability: Temperature drift: 0.2uV / ° C (0-60 ° C); Zero drift: ≤ 0.1% / 8 hour / FS;
2.12 Working temperature: 5 ℃ ~ 35 ℃
2.13 Relative temperature: 0 ~ + 60 ℃;
2.14 Ambient humidity: 15% to 80% RH;
2.15 Working environment: There is no seismic source and corrosive medium around;
2.16 Net weight: ~ 590g;
2.17 Dimensions: 245 × 66 × 37mm.
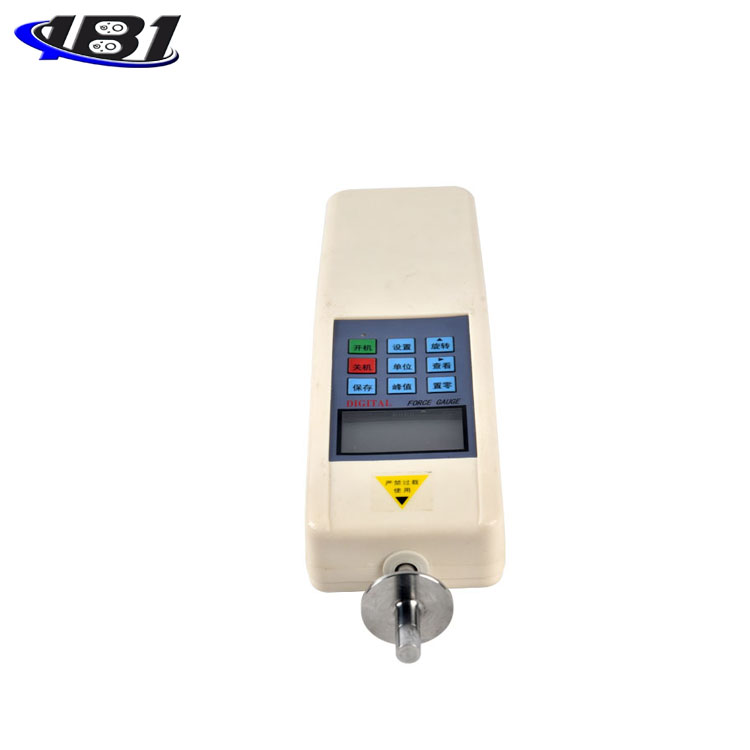
Structure diagram:
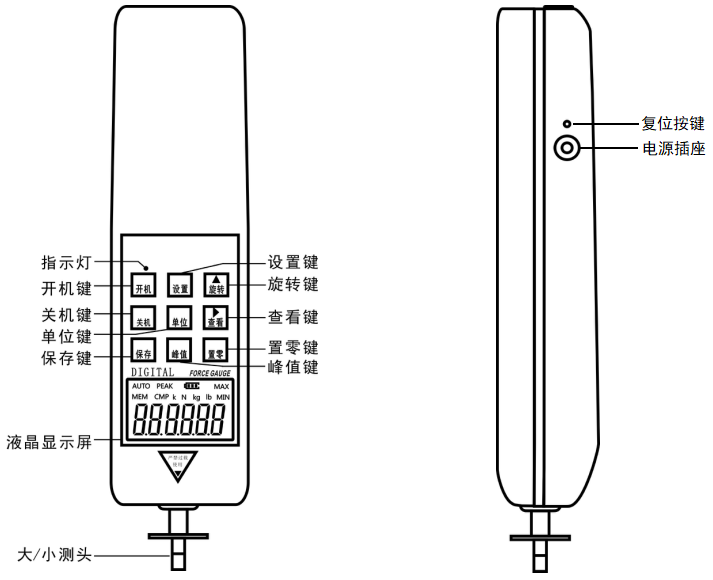
Fourth, the key description (such as the following two pictures):

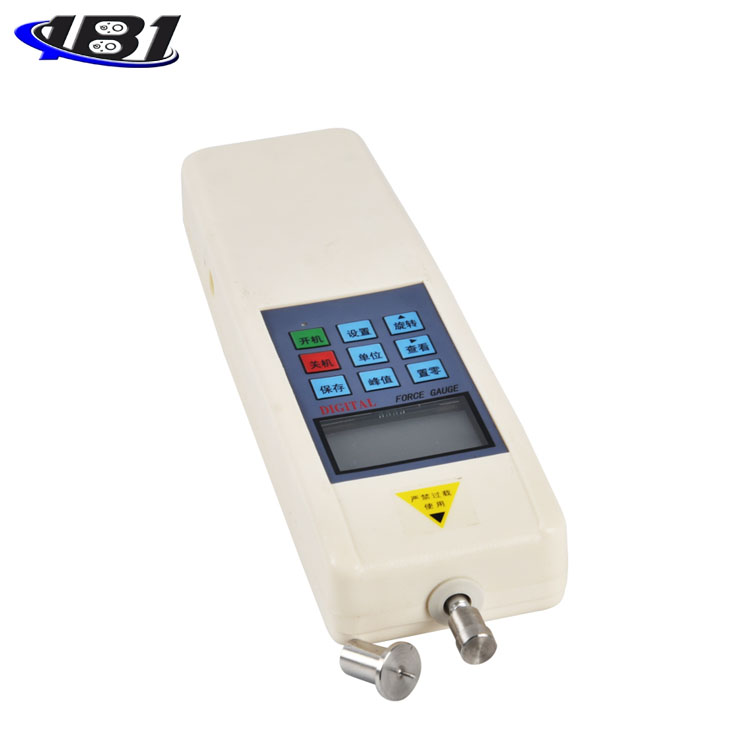
4.1 \"Startup \" key:
When you press this key, the power is turned on and the model number is displayed. After powering on, before pressing the\"\" Zero\"key\" to clear, the zero drift value of the analog signal may be displayed on the screen, just press the\"\" Zero\"key\" to clear it.
4.2 \"Shutdown \" key:
In the power-on state, when you press this key, the power is turned off, but the stored saved data will not disappear. When starting up (that is, when the model number is displayed and the measurement interface 0.0 is not displayed), pressing the shutdown key at this time cannot respond.
4.3 \"Save \" key:
In the peak measurement interface state, press this key to save the test data displayed on the screen; in the function setting interface state, press this key to save the set parameters. When some test data is stored in the machine, \"MEM \" is displayed. This machine can store 447 data.
4.4 \"Peak \" key:
Each time you press this key, there will be a switch between \"PEAK \" display, \"AUTO PEAK \" display or \"PEAK \" disappearing—that is, peak hold, peak hold automatic release, and load real-time value mode switching.
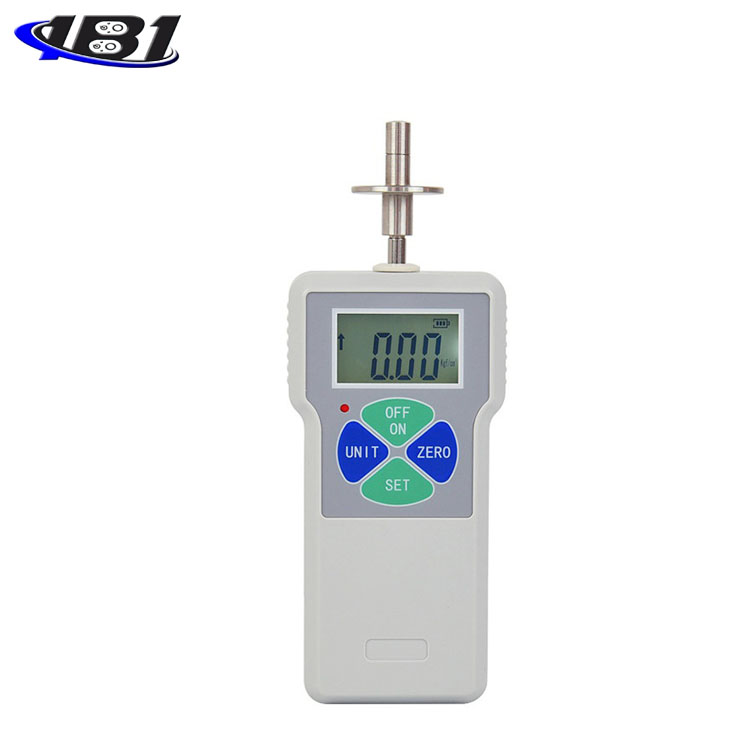
4.5 \"Unit \" key:
Press this key to execute the measurement unit switch, which can display three units of N (Newton), kg (kg) and lb (pound) in a cycle. When the test data is displayed, the unit conversion of the same value can also be completed.
4.6 \"Settings \" key:
In the real-time measurement interface, press this key to enter the setting item interface; in the setting item interface, press this key to enter the required setting option.
4.7 \"Rotate \" key:
This key is only valid in the test interface. When this key is pressed, the measured value displayed on the screen will flip 180 degrees.
4.8 \"View \" key:
When you press this key, the stored test data will be called up and displayed on the screen in sequence. At this time, the word\"\" MEM\"\" will flash-the number of saves will be displayed first, and the saved data will be automatically displayed after 2 seconds. Press the\"Zero Set\" key to return to the measurement interface.
4.9 \"Zeroing \" key
When you press this key, the test value on the screen will be reset to zero. Note: When the instrument is reset to zero, the instrument can only be reset to zero in the real-time measurement mode and under the peak and automatic peak.
※ Select a lighter fixture or release the applied load and clear it again.
※ On the \"View \" interface, press and hold this key for 4 seconds, all the stored test data can be cleared (it may not be cleared in some states, then restart the machine and then execute this function to clear all saved data) .
Five, screen display instructions
5.1 PEAK
When \"PEAK \" is displayed, it means Peak mode, and the display shows the peak value until it is manually cleared. When \"AUTO PEAK \" is displayed, it means \"auto peak \" (Peak hold automatic release mode) ), It will be cleared automatically after 2 seconds of displaying the peak value; when \"PEAK \" is not displayed, it means \"track mode \" (real-time load value mode).
5.2 MEM
When the measurement data is stored,\"\" MEM \"is displayed. When you press \"View \" to view the measurement data, \"MEM \" flashes.
Six, stored data
6.1 Stored data
In the PEAK state, after the test is completed, press the\"Save\" key to store the data. The display will show\"MEM\" on the display. The stored data can be saved even after the power is turned off. When you use the\"\" View\"\" key to view the stored data,\"\" MEM \"flashes, the number of times of storage appears first, and the stored value automatically appears after 1 second. Press the\"Zero Zero\" key to return directly to the measurement interface. The data can also be input into a computer for analysis and processing. This machine can store 447 data.
6.2 Clearing stored data
When pressing the\"\" View\"\" key to enter the stored data interface, press the\"\" Zero\"\" key for more than four seconds, all the stored data will be cleared,
\"MEM \" disappears.
This machine can be connected to a computer and enter test data into the computer. View and print the number of tests, average, maximum, minimum, and determine whether the test results meet the set requirements.
7. Other functions:
7.1 Printing function description:
This function can output the stored test data to a computer through a data cable for printing.
a. First run the CD that came with the machine, open the resulting folder, click the\"data export program\" file, then click the\"setup.exe\" file, and then click\"Next\" →\"Next\" Step \"→ \" Done \".
b. Connect the instrument to the computer with a data cable. When the instrument is powered on, when the LCD screen shows zero, double-click the \"dynamometer communication software 3.0.exe \" shortcut key on the desktop, and then Click \"Receive \" in the pop-up window, and the stored test data will be output to the computer through the data cable. After receiving the data, click \"Print \", and click Print in the pop-up window to print.
7.2 Synchronous test function description:
This function can display the synchronous test curve and data during the test.
a. After running the CD that came with the machine first, you will find it in the folder. After opening, click the\"\" Sync Test Software\"\" file, then click the\"Install.EXE\" file, and then click\"Next\" Keep clicking \"Next \" → \"Done \".
b. For specific operation steps, please run the download of the\"Dual Digital Push-Pull Force Gauge Synchronous Test Function Demonstration\" on the homepage of the company and refer to the operation of this demo.
7.3 Resolving the crash state description:
When the measuring instrument freezes, press the\"\" Reset\"\" key on the left side of the measuring instrument.
Changes in the value of gravity acceleration
Press the\"\" Settings\"\" key under the power-on state, and the display is\"\" TEST \". At this time, press the\"\"Up\"\"key 7 times to enter (G.SET) Gravity acceleration setting. The user can set the gravity acceleration value according to the location of the area, and use the\"\" up\"and\" right\"keys to set. \"Save \" returns to the setting project interface, the default value of the instrument is 9.800
Nine, calibration method
1. Synchronous test software can be connected to a computer for testing. The computer displays the test force curve chart and detailed test force records during the test, and can save, print, and perform various analyses (see the CD-ROM for optional functions);
2. Auto-save test value function Under \"AUTO PEAK \" state, the instrument will automatically store the test peak value. Press the\"\" View\"\" key to view the stored data, or you can use the\"\" Data export program\" \", Import the data into the computer, and the program will automatically display the data such as\" maximum value, minimum value, average value, and test number\"for analysis and use by the user (see the corresponding instructions on the CD-ROM). The interface is friendly. It can be used under the normal startup interface by connecting the machine with the matching data cable.
3. The memory storage function can store 447 test values. It can be stored manually in the state of\"PEAK\" (press the\"Peak\" key once), or it can be automatically stored in the state of\"AUTO PEAK\" (press the\"Peak key\" twice). Press the\"\" View\"\" key to view the stored memory values one after another, or you can use the\"Data Export Program\" on the supporting CD. \"Data Exporter \" on your computer to import the data to your computer;
4. Added backlight function. Press the\"\" Settings\"\" key when the computer is on, and the display will show\"\" TEST\"\". Now press the\"\" \"Key 8 times and press \" settings \"key to enter (BACSET) backlight function setting: under this setting item, use \"\"Key or \"
 \"Key selection, if selected \"
 (YES) \"means turn on the backlight function, select \"
 (NO) \"means to turn off the backlight. After selecting, press \" Save \"key to save and return to the setting item interface.
5, LCD liquid crystal display flip display Press \"Flip\" key to make the reading 180 degrees inverted display, convenient to view the test value from different angles;
6. Auto peak function Press the\"\" Peak\"\" key 2 times, and\"AUTO PEAK\" will be displayed on the screen. Press the\"\" Settings\"\" key in the power on state, and the display will be\"\" TEST \". Now press the\"\"\"Key 6 times and press \" set \"key to enter to (PE.SET) Automatic peak save time setting, the unit is second, the default value is 10, use\"\"\"Key and \"\"Key setting. \" Save \"returns to the setting item interface; the setting cannot set this value to 0.
7, automatic shutdown time settings can be set to 10 minutes to 90 minutes automatically shut down, can also be set not to automatically shut down. Press the\"\" Settings\"\" key in the power on state, and the display will be\"\" TEST \". Now press the\"\"\"Key 5 times and press \" set \"key to enter (OFFT) Automatic shutdown time setting: Under this setting item, use \"\"Key or \"\"Key selection, you can set 10 minutes to 90 minutes to automatically shut down, you can also set \" 00 \"not to automatically shut down. If you choose not to automatically shut down, press the \" Save \"key after selection to complete the setting. Return to the options screen. The instrument is set to 10 minutes by default.
8. The battery capacity display is divided into 3 grids, 2 grids, and 1 grid. The instrument will automatically shut down when the power is too low;
9. Accidental crash quick reset A reset button is arranged on the side. Press the reset switch with a hard object to shut down.
Ten, test operation steps
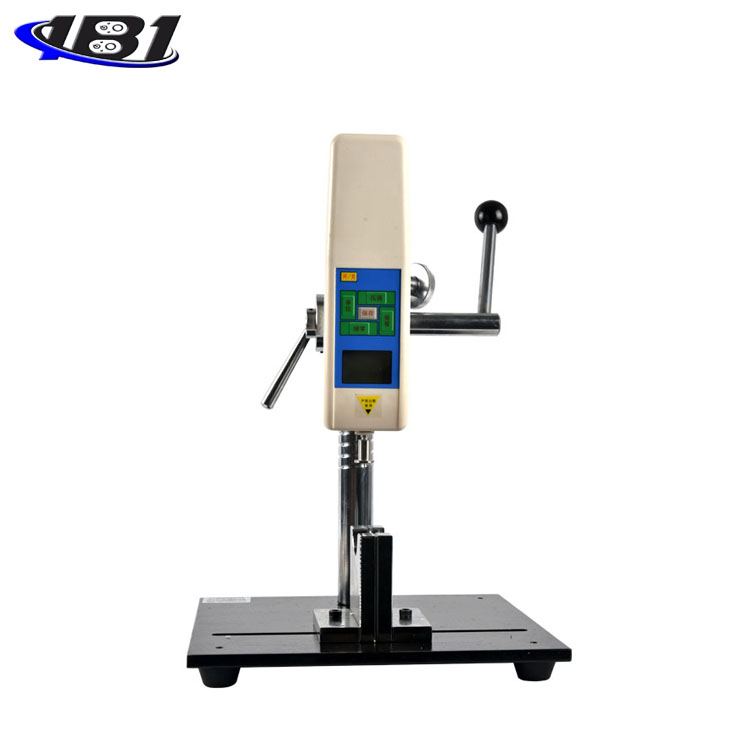
1. The specific operation method of the instrument installed on the test machine:
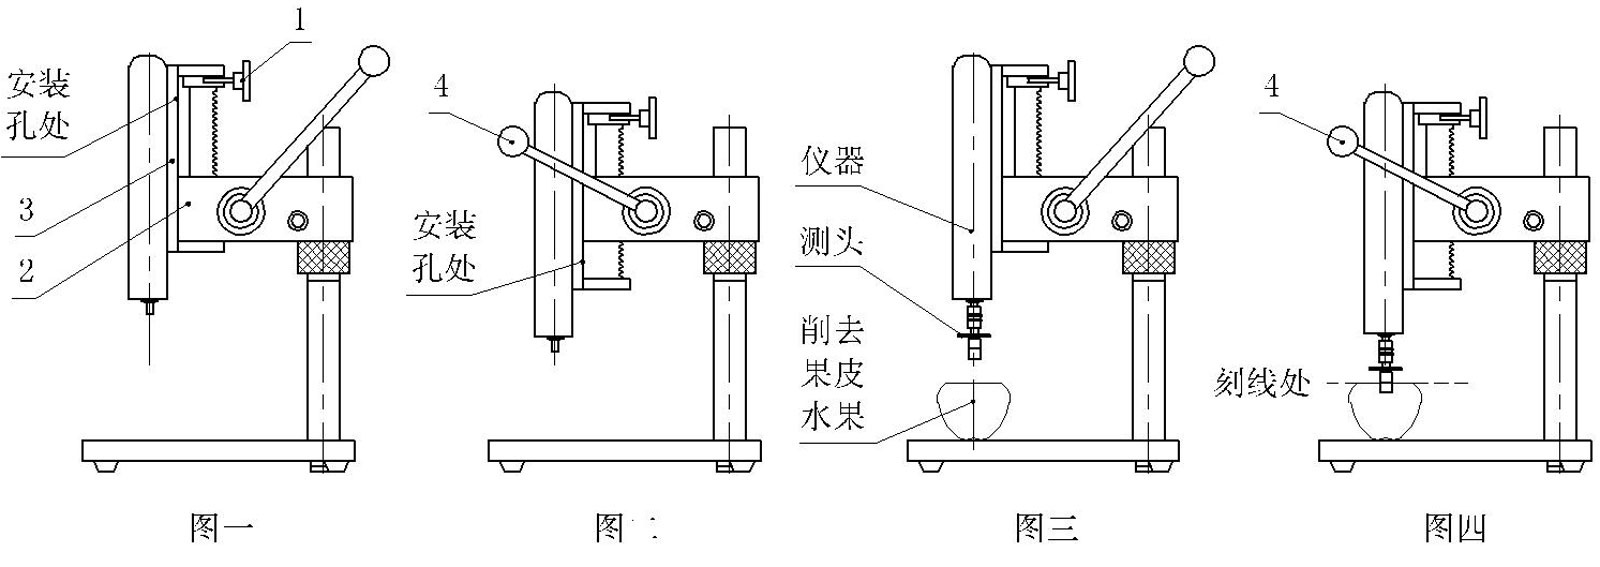
A. Unscrew the adjustment handle 1 first, and slide it down to make contact with the chassis 2 so that the two mounting holes above the mounting plate 3 are exposed; then use the mounting screws and spring pads to install the two upper holes of the instrument on the mounting plate 3. ; Finally, loosen the adjustment handle 1 and return to the original upper position to lock it. (As pictured above)
B. After the handle 4 is pressed down, the two mounting holes below the mounting plate 3 can be exposed; then the two holes below the instrument are mounted on the mounting plate 3 with mounting screws and spring pads. (As shown in Figure 2 above)
C. Follow the two steps above to tighten all four screws.
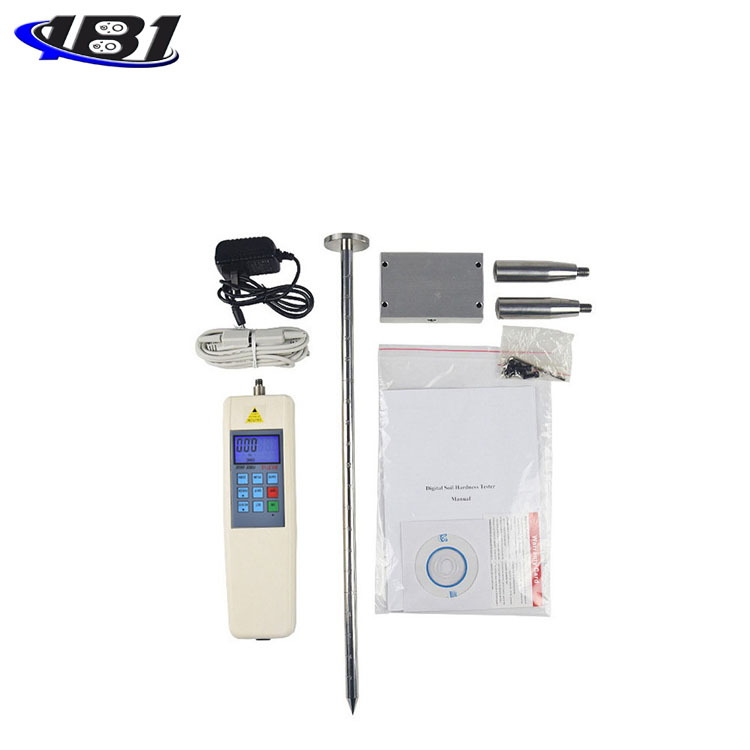
2. Select a suitable probe (Note: when a probe with a diameter of 11 is used, the hardness value displayed by the instrument is the actual fruit hardness value; when a probe with a diameter of 8 is used, the hardness value displayed by the instrument is 2 times the actual fruit hardness Value), use a connecting sleeve with an internal thread to mount the probe to the test rod of the instrument. (As pictured above)
3. Before measurement: First peel the fruit to be measured about 1 square centimeter of peel. When measuring, make the center of the fruit to be tested line up with the test rod of the instrument so that the force value of the test can be more accurate. (As pictured above)
4. Start the measurement: press the\"On\" button to turn on the power. After the LCD display is stable, press the\"Peak\" button to enter the peak measurement mode. (If the display is not zero, press the\"Zero\" button. (Cleared), press the handle 4 down to make the probe point to the peeled flesh, press it evenly until the score line, and complete the measurement. The displayed value is the fruit hardness. (Figure 4)
5. After the test is completed, remove the load, turn off the power, remove the jig, clean each item and put it back in the tool box for the next use.
Eleven safety precautions
1. Matters needing attention:
a. After purchasing this instrument, if the instrument has insufficient power, it needs to be charged for 4 ~ 6 hours before it can be used normally.
b. To purchase this instrument, you must use the RS232 computer cable included in the accessories distributed by our company.
c. If the operation is incorrect, it may damage the instrument or cause serious accidents. This manual points out important matters for preventing accidents and how to use the instrument. Please read this manual carefully before use, and keep it in a safe place for future reading.
d. If it is testing the impact load, please choose the model with the maximum load double the impact load to be tested.
2. Warnings:
a. During the destructive test, wear a protective mask and gloves to prevent the splashing material from hurting the human body during the test.
b. Do not use fixtures that are damaged or severely deformed. Please refer to the relevant parameters in this manual for the self-made jig (the company has other kinds of jigs, customers can choose according to their needs; purchase separately).
C. Do not use the instrument beyond its maximum range. Doing so may cause damage to the sensor or even an accident.
d. When the test value exceeds 100% of the full scale, the buzzer will beep continuously. At this time, please quickly remove the added load or reduce the load. When the test value exceeds 120% of the full scale, the instrument may be damaged.
3. Solve the crash state: When the instrument crashes unexpectedly, press a small round rod on the left side of the instrument and press a button labeled\"\" Reset\"\" to quickly reset and shut down.
4. Safety matters:
a. Please use the matching charger to charge, otherwise it will cause circuit failure or even fire.
b. Do not use a power source other than the rated voltage of the charger, otherwise it may cause electric shock or fire.
c. Do not pull out or plug in the power supply with wet hands, otherwise it may cause electric shock.
d. Do not pull the power cord of the charger to pull out the plug, so as to avoid the electric wire being torn and getting an electric shock.
e. Please use a soft cloth to clean the machine. Immerse the cloth in water soaked in detergent and wring it dry before removing dust and dirt. Note: Do not use volatile chemicals to clean the unit (such as volatile agents, thinners, alcohol, etc.).
f. Do not operate the machine in the following environments
① A humid environment ② A dusty environment ③ A place where oil or chemicals are used ④ A place with a vibration source around
g. Please use and store within the specified temperature and humidity range, otherwise it may cause the instrument to malfunction.
h. Do not disassemble, repair or modify the machine yourself. These actions may cause permanent failure of the instrument.
i. Other outstanding matters needing attention in safety production.
Confirmation items of J, EY-4 fruit hardness tester before sending for repair
|
power supply |
symptom |
Cause or phenomenon |
Dispose |
|
Press \"Startup \" key no display |
Battery is dead |
Recharge |
|
|
Unable to charge |
Charging using a converter that does not meet the specifications |
Please confirm: AC110V AC220V |
|
|
The charging indicator is off |
Battery is too low and requires a wake-up charging time |
Charge the battery for half an hour without the indicator light. If the instrument is normal, the indicator light will re-light. |
|
|
test value |
Test value is not accurate |
Excessive error |
Need to return to factory for correction |
|
other |
Unexpected crash |
No response when pressing any key |
Press the \"Reset \" key with the needle |
Thirteen, outline and installation dimension drawing (the two sets of holes on the installation drawing are for fixing on a special measuring rack, and the measuring rack is self-equipped)
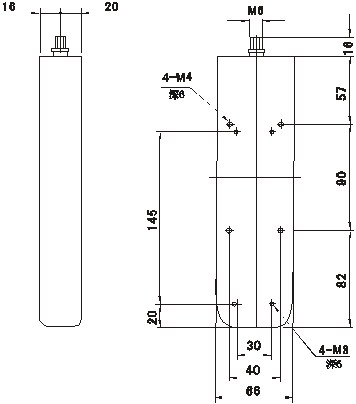
2 sets of installation dimensions: 4-M4—40 × 90
4-M3—30 × 145
Special Note:
The EY series fruit hardness tester has a variety of specifications for users to choose. Users can choose the corresponding specifications of the instrument according to the force value of the product to be tested. The scientific use test range is from 10% to 100% of full scale. The metrology department recommends not to use less than 1% of full scale.
Fourteen, packing list
|
Serial number |
name |
Quantity |
|
1 |
Digital display |
1 set |
|
2 |
Indenter φ11.1mm / φ7.9mm |
1 each |
|
3 |
M3 * 8 / M3 * 12 Phillips screws |
4 each |
|
4 |
M6 nut |
2 |
|
5 |
Spring pad φ3 |
8 |
|
6 |
RS232 computer connection cable |
1 |
|
7 |
Supporting software CD and operation demonstration CD |
1 serving |
|
8 |
charger |
1 |
|
9 |
user's manual |
1 serving |
|
10 |
Inspection certificate |
1 serving |
|
11 |
Certificate of conformity and warranty card |
1 serving |
|
12 |
Desiccant |
1 package |


 DC9.4V
 DC9.4V