support hotline
0577-57572522

Thank you for purchasing Digital Fruit Hardness Tester:
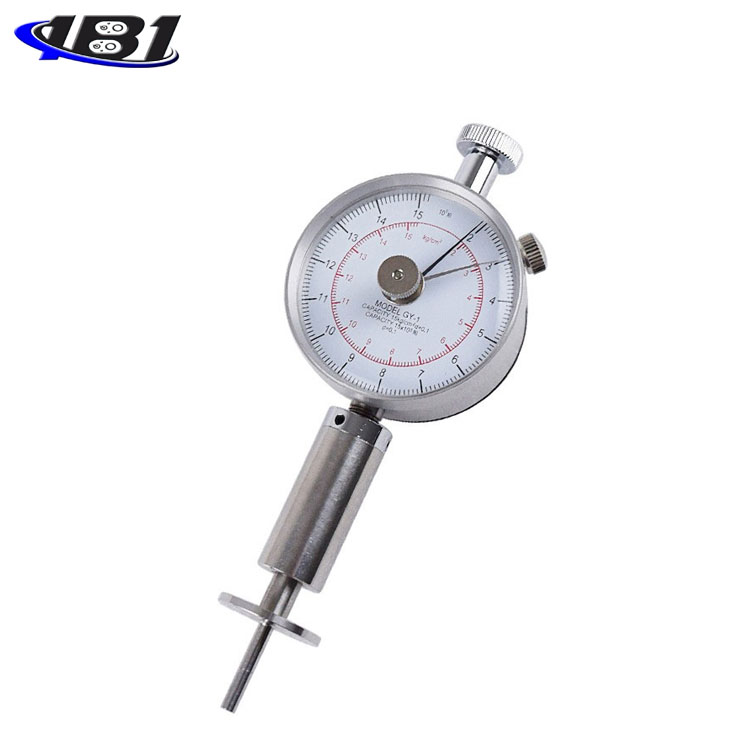
This instrument has the advantages of high accuracy, easy operation, and convenient carrying. And can be used in conjunction with a special test bench to improve measurement accuracy. (Special note: EY series fruit hardness tester has a variety of specifications for users to choose. Users can choose the corresponding specifications of the instrument according to the hardness value of the product to be tested. The scientific use measurement range is 10% to 100% of full scale The metrology department recommends not using less than 1% of full scale.)
I. Features:
1. Digital display, easy to read and high precision.
2. Light weight, small size, easy to carry.
3. The standard fruit hardness unit Kgf / cm2 is displayed.
4. It is powered by 3.7V lithium battery, and the battery has short circuit, leakage, overload protection, and low battery warning. In addition, the instrument will automatically shut down after ten minutes of inactivity.
5. It has two measurement modes: real-time and peak free switching.
6, with a set of installation dimensions: to adapt to most domestic and foreign test machines, convenient for users to install on the machine.
Technical parameters:
|
EY-15 |
EY-30 |
|
|
Range |
0.2 ~ 15 Kgf / cm2 (× 105 Pa) |
0.4 ~ 30Kgf / cm2 (× 105 Pa) |
|
Indenter (probe) diameter |
1 #: Φ11.1mm |
2 #: Φ7.9mm |
|
Load division |
0.01Kgf / cm2 |
|
|
Precision |
||
|
Indentation depth |
10mm |
|
|
power supply |
3.7V lithium battery |
|
|
Charging time |
||
|
Battery continuous use time |
About 10 hours |
|
|
Battery Life |
≥300 times |
|
|
charger |
Input: AC 220V 50 / 60HZ Output: DC 5V 1000mA |
|
|
stability |
Temperature drift: 0.2uV / ° C (0-60 ° C) Zero drift: ≤ 0.1% / 8 hour / FS |
|
|
Operating temperature |
5 ℃ ~ 35 ℃ |
|
|
Transport temperature |
0 ℃ ~ 60 ℃ |
|
|
Relative humidity |
15% ~ 80% RH |
|
|
working environment |
No vibration source and corrosive medium around |
|
|
net weight |
About 260g |
|
|
shape |
160mm × 71mm × 35mm |
|
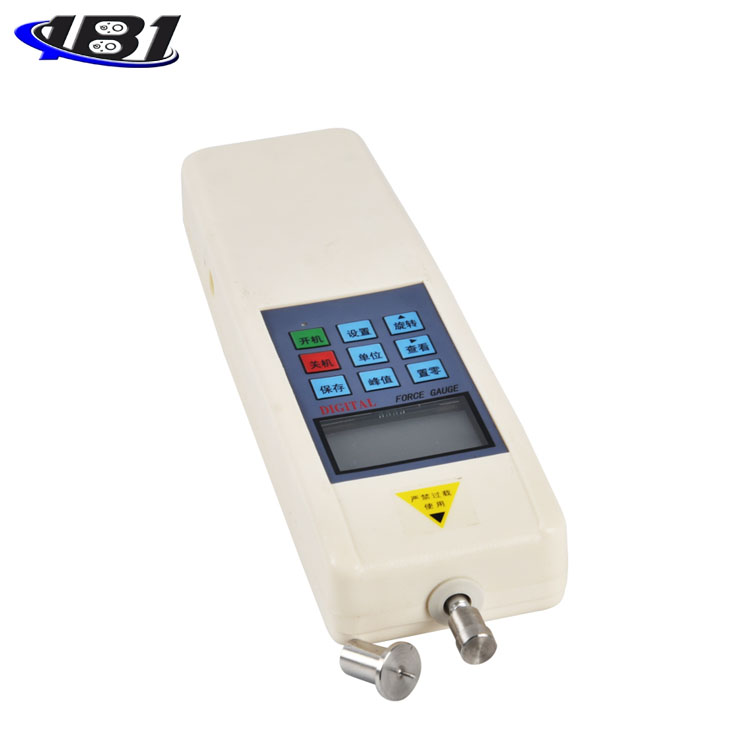
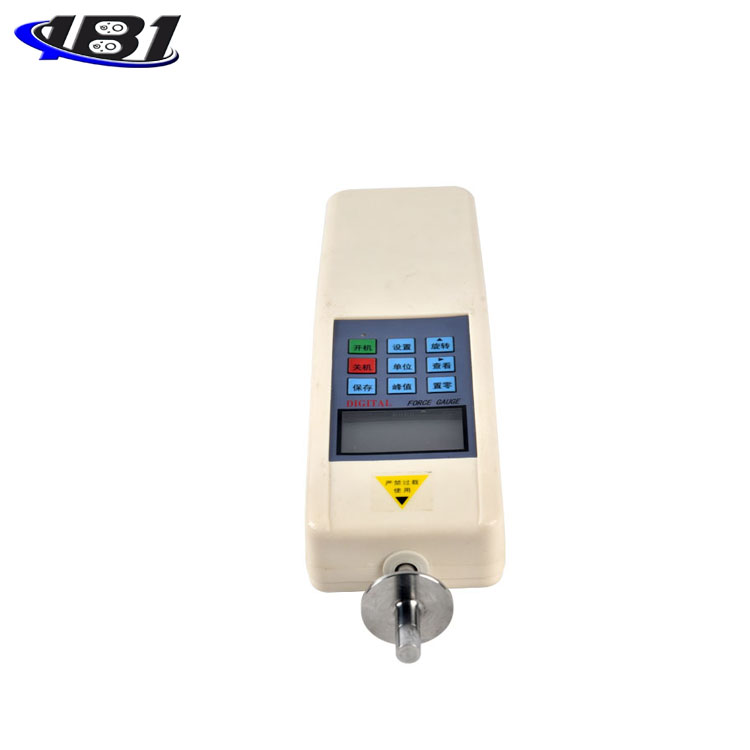
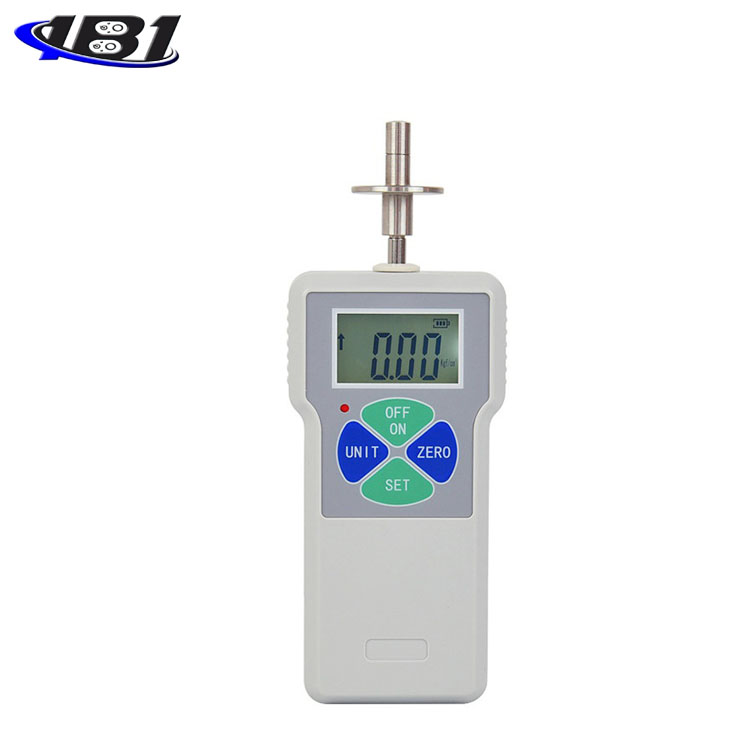
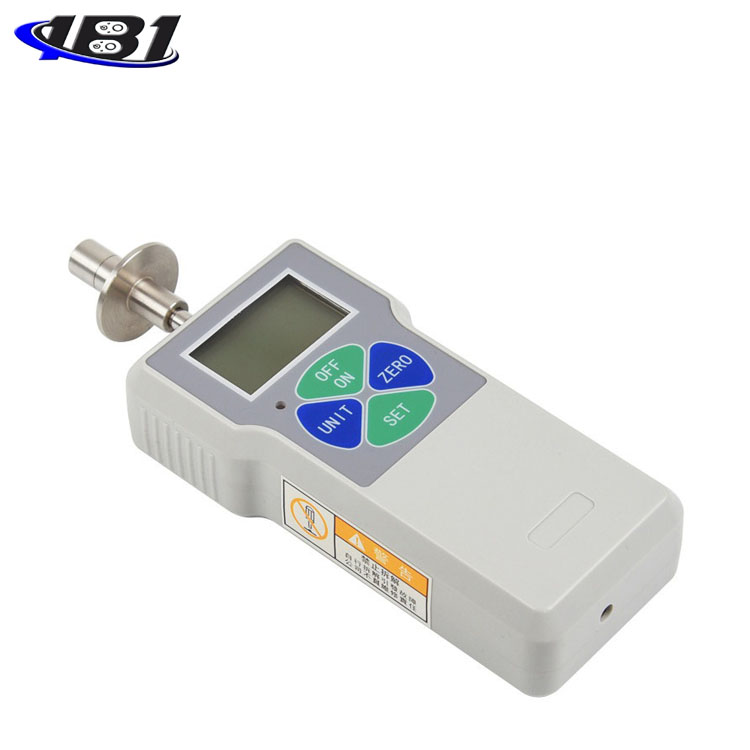
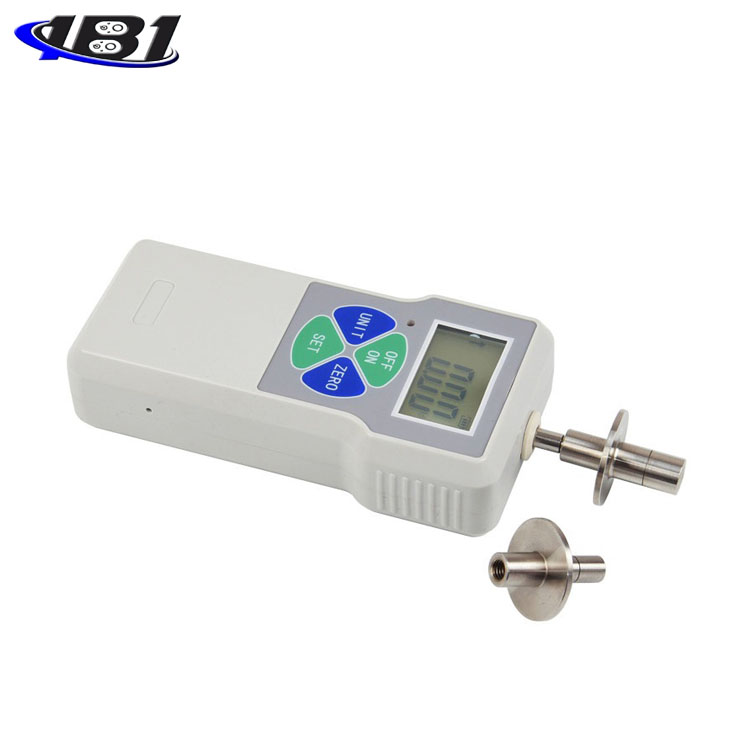
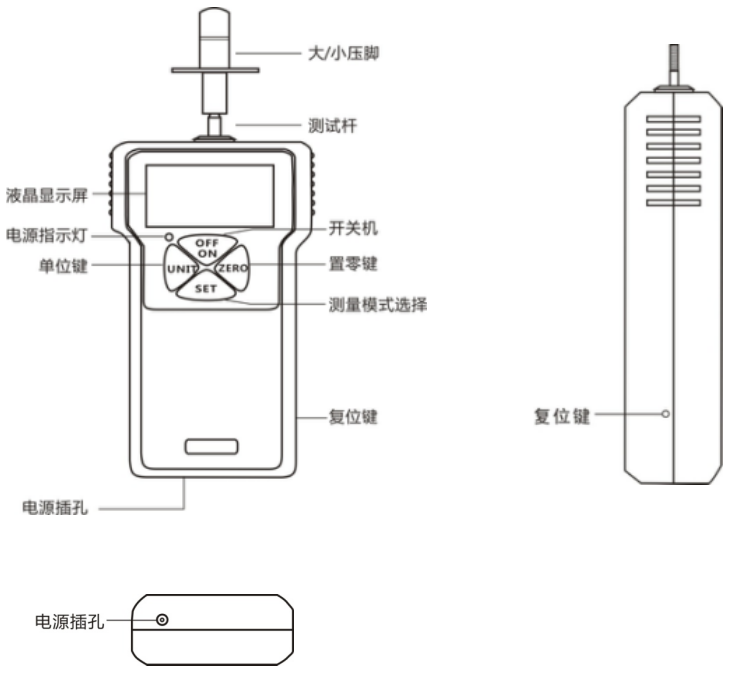
Third, the shape structure
Fourth, the key introduction
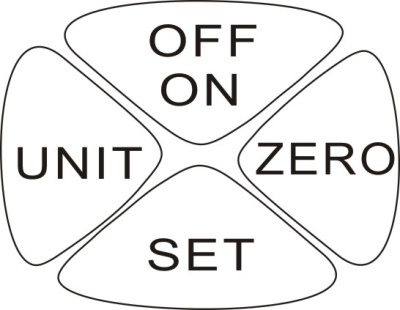
ZERO (\"Zero \" key): In the measurement interface, when this key is pressed, the test value on the screen will be cleared to zero.
SET (\"mode switch \" key): When you press this key, you enter the peak measurement mode. Long press the\"\" SET\"\" key for 4-5 seconds to enter the setting interface.
UNIT (\"Unit switch \" key): Press and hold this key for 4-5 seconds in the measurement interface, and the digital display on the screen will flip.
Five, screen display
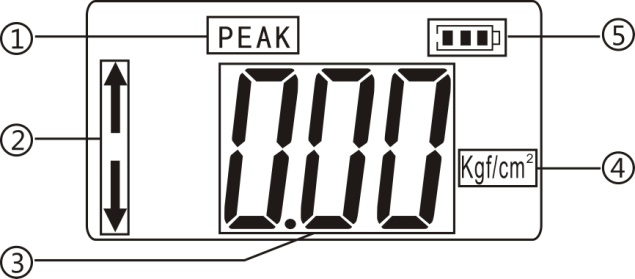
① Peak mode: After powering on, enter the measurement interface and press \"SET \" key to enter \"Peak mode \" to record the maximum hardness value measured in a period.
② Force indication: The hardness tester does not move, the upper arrow shows tension, and the lower arrow shows thrust.
③ The measured hardness value is displayed.
④ The standard fruit hardness unit shows: Kgf / cm2.
⑤, battery display.
Six, boot display

Function introduction
a. Setting items:
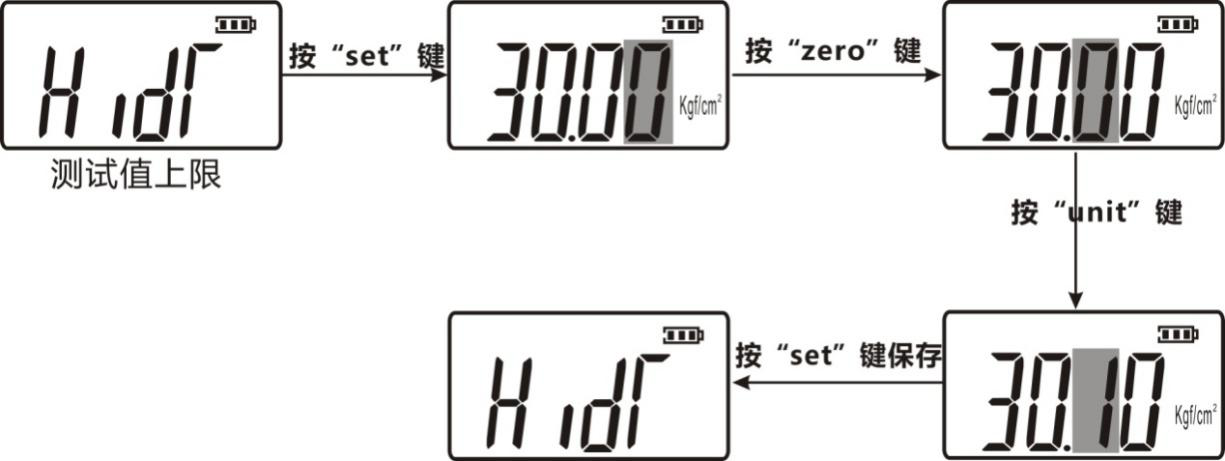
After entering the measurement interface after power on, press and hold the\"\" SET\"\" key for 4-5 seconds, then release it to enter the setting interface, display\"\" HIDT \", and then continue to press\"\"UNIT \", other Setting items: \"LODT \", \"L.SET \", \"OFFT \", \"G.SET \", \"BAC.S \", \"R.SET \", as shown in the figure below Show:
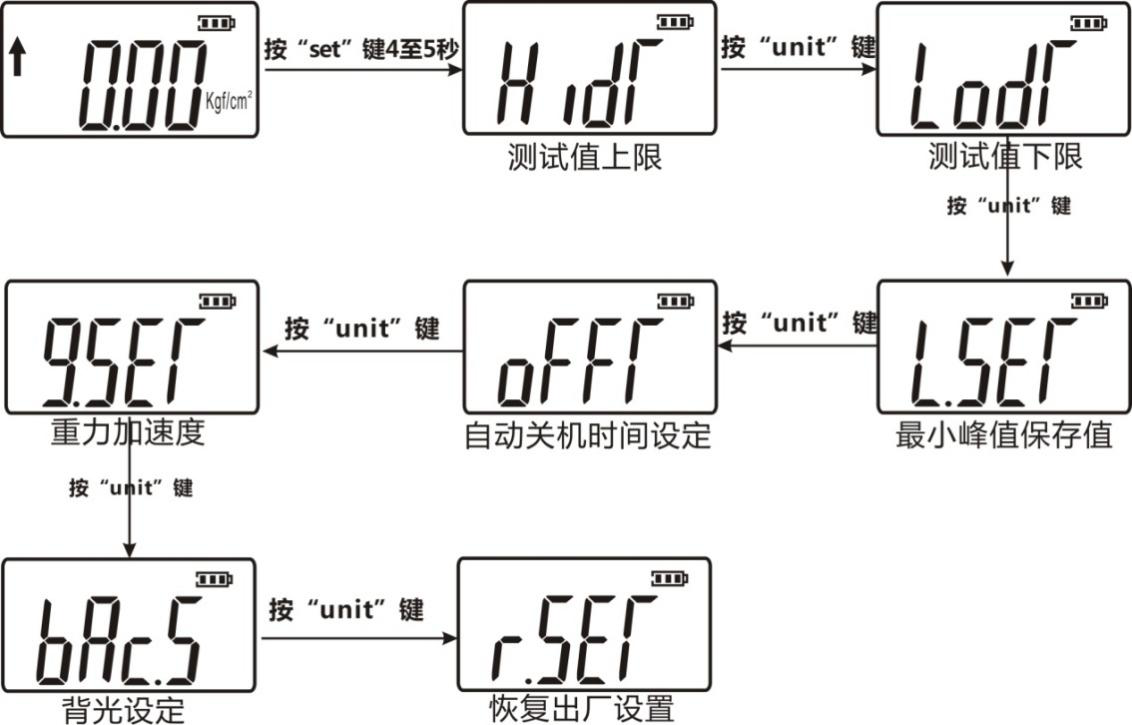
 (HIDT) Test value upper limit setting: Set the upper limit of the test value. The upper limit value defaults to 100% of the full scale. Above the upper limit is out of range and the instrument will beep. If you want to reset the upper limit, you can use the\"\" UNIT\"\" key and the\"\" ZERO \"key to set it. Press \"SET \" key to save and return to the setting item interface automatically. As shown below:
 (LODT) Test value lower limit setting: Set the lower limit of the test value. The lower limit defaults to 0. Below the lower limit is out of range and the instrument will beep. If you want to reset the lower limit, it is similar to the previous step. Use the\"\" UNIT\"\" and\"\" ZERO \"keys to set. Press \"SET \" key to save and return to the setting item interface automatically.
 (L.SET) Peak minimum saved value: The minimum peak saved value. In the peak mode, when the current value is less than this value, the peak value will not be saved.
 (OFFT) Automatic shutdown time setting: Under this setting item, use the\"\" UNIT\"\" key and the\"\" ZERO \"key to set, you can set the automatic shutdown from 1 minute to 9999 minutes, or \" 00 \"Does not shut down automatically. If you choose not to shut down automatically, press \"SET \" key to finish the setting. You are returned to the options screen. The instrument is set to 10 minutes by default.
 (G.SET) Gravity acceleration setting: The user can set the gravity acceleration value according to the location of the area. The default value is 9.800.
 (BAC.S) Backlight function setting: Under this setting item, use \"UNIT \" key to select, if you choose \"
 (YES) \"means turn on the backlight function, select \"
 (NO) \"means to turn off the backlight. After selecting, press the\"\"SET\" key to save and return to the setting item interface.
 (R.SET) Factory reset function: Under this setting item, press \"SET \" key to restore factory settings and the machine shuts down. If you use the machine to restart.
Eight, test operation steps:
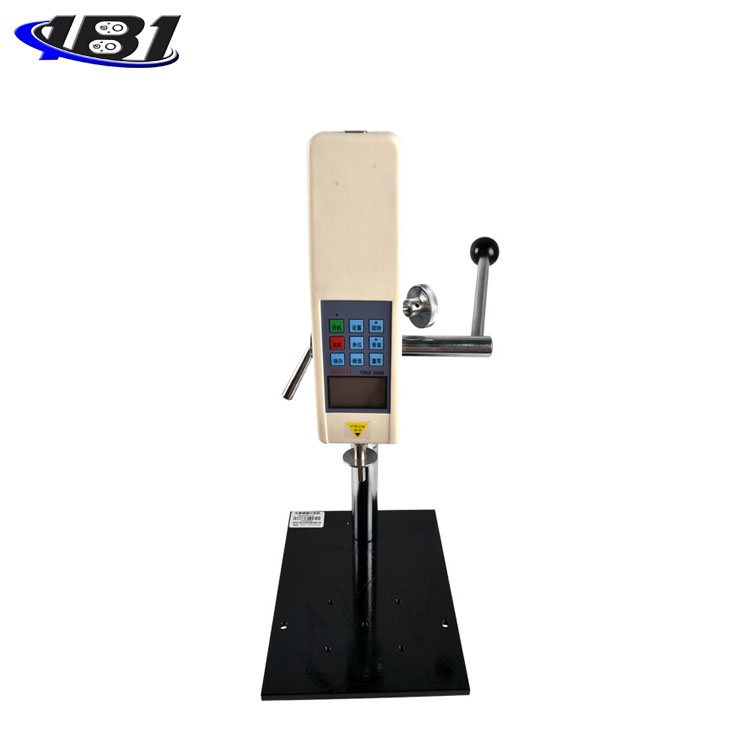
1. The specific operation steps of installing the digital display meter on the test machine (the test machine is purchased separately):
A. Install the digital display meter on the adapter board with 4 M4 * 6 hexagon socket head screws.
B. Loosen the\"adjustment handle 1\" and slide it down to the upper end of the\"chassis 2\" (at this time, the two M3 holes above the\"installation plate 3\" are exposed). Use two M3 * 6 cross recessed pan head screws to pass through the two M3 holes above the\"installation plate 3\", and fix the adapter plate and the\"installation plate 3\" together. Finally, loosen the\"adjustment handle 1\", return it to its original position, and then tighten the\"adjustment handle 1\" to fix it. (Figure 1)
C. To the strength of the\"handle 4\", make it move clockwise (at this time, the two M3 holes below the\"mounting plate 3\" are exposed). Use two M3 * 6 cross recessed pan head screws to pass through the two M3 hole positions under \"Mounting plate 3 \", and fasten the adapter plate and\"Mounting plate 3\". (Figure 2)
D. Follow the two-step operation method and tighten all four screws.
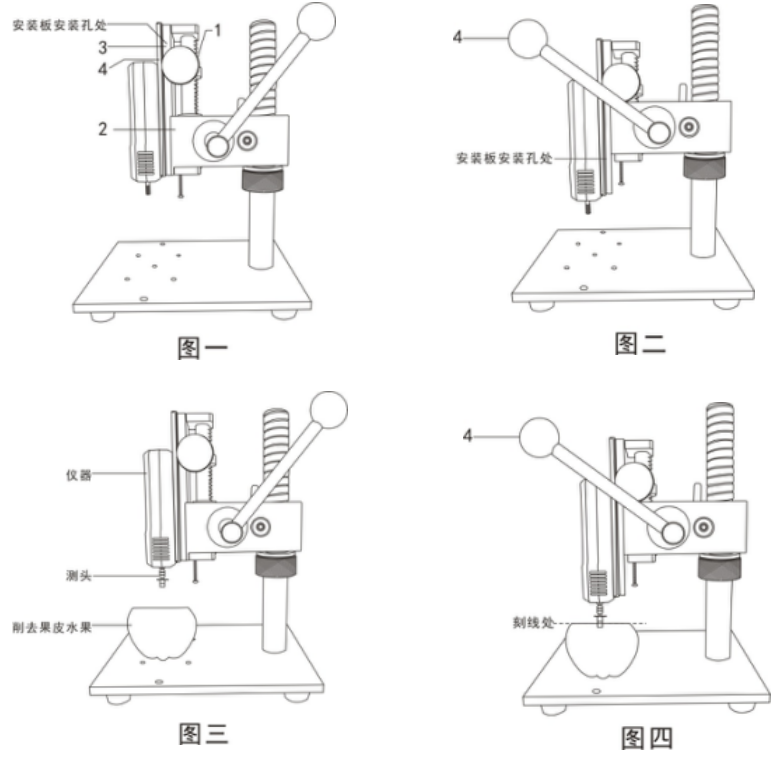
2. Select the standard presser foot and install it in the corresponding position on the digital display. (Figure three)
3. Before measurement: First peel the fruit to be measured about 1cm2. When measuring, make the center of the fruit to be measured in line with the presser foot of the instrument, so that the measured value can be more accurate. (Figure three)
4. Start measurement: Press the\"\" ON / OFF \"key to turn on the power. After the LCD display is stable, press the\" SET\"key to enter the peak measurement mode (if the display is not zero, press \" ZERO \"Key cleared). Apply force to the handle 4 to press the presser foot into the pulp of the measured fruit (evenly) until the score line. After the measurement is completed, the value displayed on the screen is the hardness value of the fruit. (Figure 4)
5. After the test is completed, remove the load, turn off the power, remove the jig, clean each item and put it back in the tool box for the next use.
Nine, safety precautions
1. Matters needing attention:
a. After purchasing this instrument, if the instrument has insufficient power, it needs to be charged for 4 ~ 6 hours before it can be used normally.
b. If the operation is incorrect, it may damage the instrument or cause serious accidents. This manual points out important matters for preventing accidents and how to use the instrument. Please read this manual carefully before use, and keep it in a safe place for future reading.
Warnings:
a. During the destructive test, wear a protective mask and gloves to prevent the splashing material from hurting the human body during the test.
b. Do not use a damaged or severely deformed probe.
c. Do not use the instrument beyond its maximum range. Doing so may cause damage to the sensor or even an accident.
d. When the test value exceeds 100% of full scale, the buzzer will beep continuously. In this case, please quickly remove the added load or reduce the load.
3. Solve the crash state: When the instrument crashes unexpectedly, press a small round rod on the right side of the instrument with a button labeled\"\" Reset\"\" to quickly reset and shut down.
4. Safety matters:
a. Please use the matching charger to charge, otherwise it will cause circuit failure or even fire.
b. Do not use a power source other than the rated voltage of the charger, otherwise it may cause electric shock or fire.
c. Do not pull out or plug in the power supply with wet hands, otherwise it may cause electric shock.
d. Do not pull the power cord of the charger to pull out the plug, so as to avoid the electric wire being torn and being shocked.
e. Please use a soft cloth to clean the machine. Immerse the cloth in water soaked in detergent and wring it dry before removing dust and dirt. Note: Do not use volatile chemicals to clean the unit (such as volatile agents, thinners, alcohol, etc.).
f. Do not operate the machine in the following environments
① A humid environment ② A dusty environment ③ A place where oil or chemicals are used ④ A place with a vibration source around
g. Please use and store within the specified temperature and humidity range, otherwise it may cause the instrument to malfunction.
h. Do not disassemble, repair or modify the machine yourself. These actions may cause permanent failure of the instrument.
i. Other outstanding matters needing attention in safety production.
J. Confirm the project before sending the instrument for repair
|
power supply |
symptom |
Cause or phenomenon |
Dispose |
|
Press \"Startup \" key no display |
Battery is dead |
Recharge |
|
|
test value |
Test value is not accurate |
Excessive error |
Need to return to factory for correction |
|
other |
Unexpected crash |
No response when pressing any key |
Press the \"Reset \" key with the needle |
Ten, packing list
Dear Customer:
Hello! Thank you very much for choosing our company's digital display fruit hardness tester. When you purchase, please check whether the accessories are complete.
|
1 |
Digital display |
1 set |
|
2 |
Large presser foot (∅11.1mm) with 15kgf / cm2 |
1 |
|
3 |
Small presser foot (∅7.9mm) with 30kgf / cm2 |
1 |
|
4 |
Manual |
1 serving |
|
5 |
Certificate and warranty card |
1 piece |
|
6 |
Inspection certificate |
1 serving |
|
7 |
Charger (5V, small head) |
1 |
|
8 |
Desiccant |
1 package |
|
9 |
Hex nut M6 |
1 |
|
10 |
Hexagon socket head cap screw M4X6 |
4 |
|
11 |
Hex socket head cap screws M4X8 |
4 |