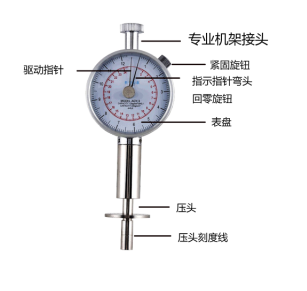
1. Purpose:
Fruit hardness tester (also known as fruit hardness tester), this product is divided into three models EY-1, EY-2, EY-3, used to measure the hardness of apples, pears, watermelons, bananas and other fruits, used to determine Fruit maturity, reasonable grasp of breeding, breeding, picking time, processing time, harvest storage, export transportation, etc. It is suitable for use in fruit tree research departments, fruit tree farms, fruit companies, colleges and universities. The instrument is small in size, light in weight, intuitive in numerical display, convenient to carry, and suitable for fruit inspection in various fruit places. It can also be used in a dedicated machine, which can improve the accuracy of the test and is suitable for professional testing departments.

Second, the principle
Fruit hardness refers to the unit area (S) of a fruit under pressure (N) from a force-measuring spring.
Their ratio is defined as fruit firmness (P).
P = N / S P-measured fruit hardness value is 105 Pa or (kg / cm2)
N-force of the force-measuring spring on the fruit surface N Newton (or kilograms)
S-the force area of fruit
Technical data
|
Type |
EY-1 |
EY-2 |
EY-3 |
|
|
Scale indication |
2-15kg / cm2 (× 105 Pa) |
0.5-4kg / cm2 (× 105 Pa) |
0.5-12kg / cm2 |
1-24kg / cm2 |
|
Probe size |
Φ3.5mm |
Φ3.5mm |
Φ11mm |
Φ8mm |
|
Accuracy |
± 0.1 |
± 0.02 |
± 0.1 |
|
|
Indentation depth |
10mm |
|||
|
Dimensions |
140 × 60 × 30mm |
|||
|
weight |
0.3kg |
|||
Method of use
Before measurement: Turn the dial to align the driving hand with the first graduation line on the dial (for EY-1, graduation line 2, and for EY-2 and GY-3, 0.5) About 1 square centimeter of skin.
When measuring: Hold the hardness tester with your hand so that the hardness tester is perpendicular to the surface of the fruit being measured, and the indenter is evenly pressed into the fruit.
Stop at the scale (10 mm). The reading indicated by the pointer is the hardness of the fruit. Take the average of three times.
After measurement: Turn the zero return knob to reset the pointer to the initial scale.
Five, matters needing attention
1. Before measurement, loosen the tightening knob, turn the dial to align the drive pointer (straight head) with the initial scale line, and then tighten the tightening knob. Check if the pointer is driving the pointer
On the right side of the needle, if it is not found, you should rotate the zero return knob so that the pointer is on the right side of the drive pointer.
2. In order to achieve better accuracy, apply pressure to the indenter before the measurement, and force it to full range for two to three times to make it lubricated.
3. When measuring hardness, it should be inserted slowly and evenly, and it must not be rotated and pressed in, not to impact measurement.
4. The indenter should be perpendicular to the surface of the fruit.
5. EY-1 and EY-2 fruit hardness testers have an outer ring scale unit of × 105 Pa and an inner ring scale unit of Kg / m2.EY-3 type. When connecting a small indenter, use the inner ring scale to read. When connecting a large indenter, use the outer scale to read.
6. The instrument and indenter should be kept clean, and the juice should be cleaned after the measurement.
7. The upper professional rack connector is used by the professional testing department for components connected to the rack. When you need to connect, turn the knob and use the inside thread to connect with the screw hole on the rack.
Just fine.
8. After using for more than one year, open the back cover and inject a small amount of watch oil to the main shaft, teeth, gem eyes, guide grooves, etc. to improve the accuracy of the instrument and extend the service life.
9. The force-measuring spring has been calibrated at the factory, and it is not allowed to turn the nut without authorization. (It is marked on the table, please do not disassemble it by yourself).
Packing list
Dear Customer:
Hello! Thank you very much for choosing our company's fruit hardness tester. When you purchase, please check whether the accessories are complete.
EY-1` EY-2
|
Serial number |
Name |
Number |
|
1 |
Hardness Tester Table |
1 |
|
2 |
Presser foot 3.5mm |
1 |
|
3 |
user's manual |
1 serving |
|
4 |
Certificate of Warranty Card |
1 piece |
GY-3
|
Serial number |
Name |
Number |
|
1 |
Hardness Tester Table |
1 |
|
2 |
Presser foot Φ8mm |
1 |
|
3 |
Presser foot Φ11mm |
1 |
|
4 |
user's manual |
1 serving |
|
5 |
Certificate of Warranty Card |
1 piece |