support hotline
0577-57572522
I. Overview
1.1 Main uses and scope of application
The leak detector is a special instrument used to find and determine the location of the leak point of the water supply pipeline. It can also be used for leak detection in other pressure pipeline systems. When the fluid in the pipeline overflows under pressure, noise can be transmitted along the pipeline or along the buried layer The medium spreads to the ground. The leak detector can determine the location of the leak along the pipeline or above its pavement. Water pipe leak detector is a leak detection instrument that uses low-power microprocessor and advanced special filters to digitally process noise. It uses a specially designed broadband high-sensitivity vibration sensor (vibrator) to connect the ground (or pipe mouth). The noise is picked up and converted into an electrical signal, which is amplified and digitally filtered, and displayed on the LCD screen with two display surfaces.
1.2 Product Features
1.2.1 Adopting a dot-matrix LCD screen with backlight, 7 vertical beams of light for easy observation at night.
1.2.2 Two changes in the special bandwidth, which not only take care of the richness of the vibration energy distribution in the audiometry process, but also can be more precise in the frequency analysis.
1.2.3 Adopt 9 channels of storage, which can store 7 band signals and 7 measured points respectively.
1.2.4 The design of the special engineering plastic case and the corresponding panel operations are very simple and straightforward, and clear and extensive information can be obtained by convenient and simple operation methods, making the leak detection and actual measurement work convenient and easy.
1.3 Product Specifications
|
Product number |
2000 |
3000 |
|
Frequency analysis width |
70HZ ~ 3000HZ range, nearly 5 octave bands, two bandwidths |
70HZ ~ 4000HZ range, nearly 5 octave bands, two bandwidths |
|
Frequency binning (center frequency) |
a, 100HZ b: 200HZ c: 400HZ d: 800HZ e: 1KHZ f: 1.5KHZ g: 2KHZ |
a. 100HZ b: 200HZ c: 400HZ d: 800HZ e: 1KHZ f: 1.5KHZ g: 3KHZ |
|
bandwidth |
a Narrow band: Symbol 符号 b. China Broadband: Symbol ┃┃┃┃┃ |
|
|
Numerical display |
Corresponds on the display bar, the minimum value of the sample value is displayed as a relative value between 0 and 100 |
|
|
screen size |
160 × 160 pixel LCD display window |
|
|
Power supply |
7.4V 3000mAh lithium battery with charging function |
|
|
Battery life |
Working time ≥35 hours after the battery is fully charged (with the backlight turned off) |
|
|
storage |
Store 9 measured values, store 9 channels separately and view them separately |
|
|
Operating temperature |
-10 ℃ ~ + 50 ℃ |
|
|
Storage temperature |
-10 ℃ ~ + 70 ℃ |
|
|
Instrument size |
(L × W × D): 210 × 98 × 98mm |
|
|
weight |
Host (including battery) 0.77kg Remote control component 0.24kg Unit price of vibration pickup 0.28kg 0.35kg Probe assembly 0.38kg Total weight of aluminum alloy portable packing box (including main unit and accessories) 5.5kg
|
|
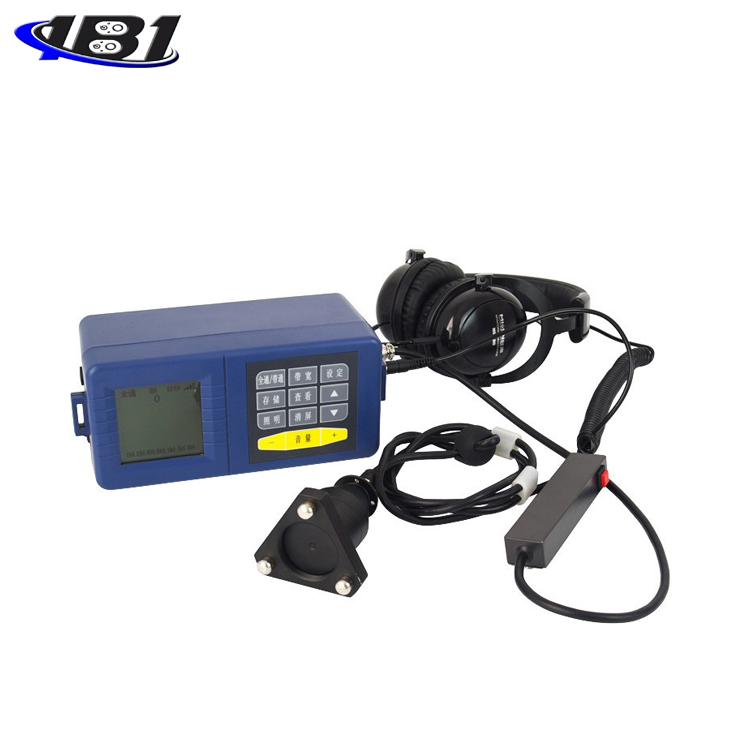
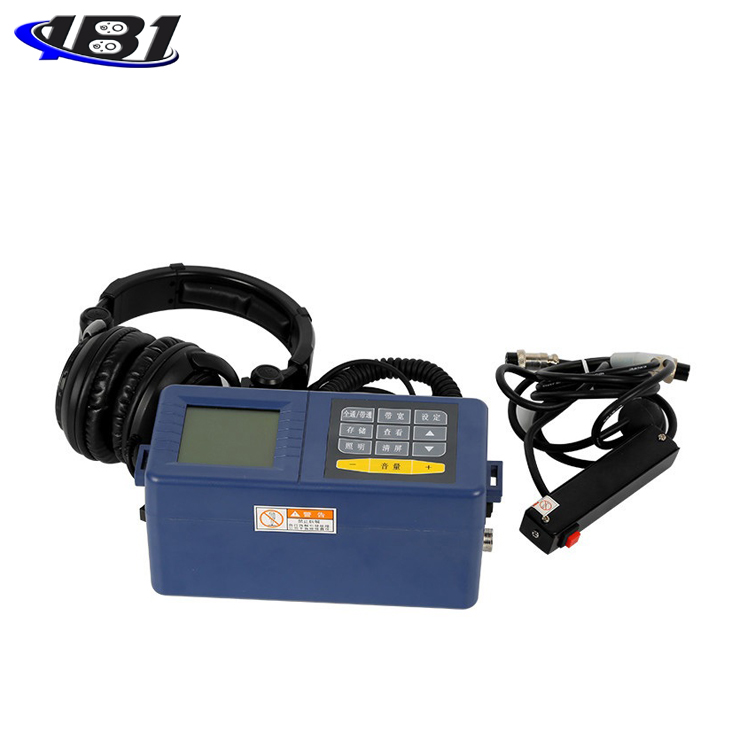
Overall product structure
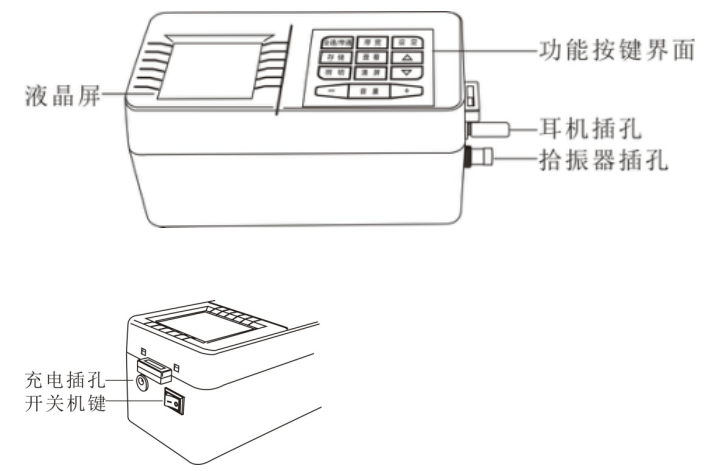
2.1 outline structure
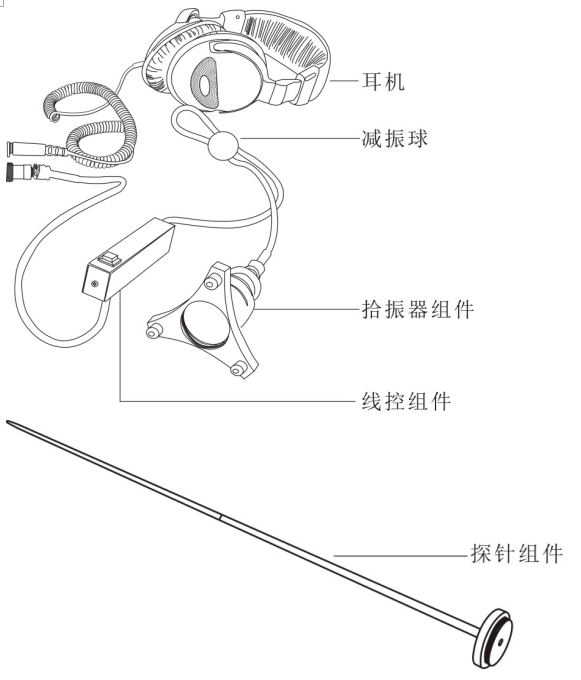
2.2 Product accessories
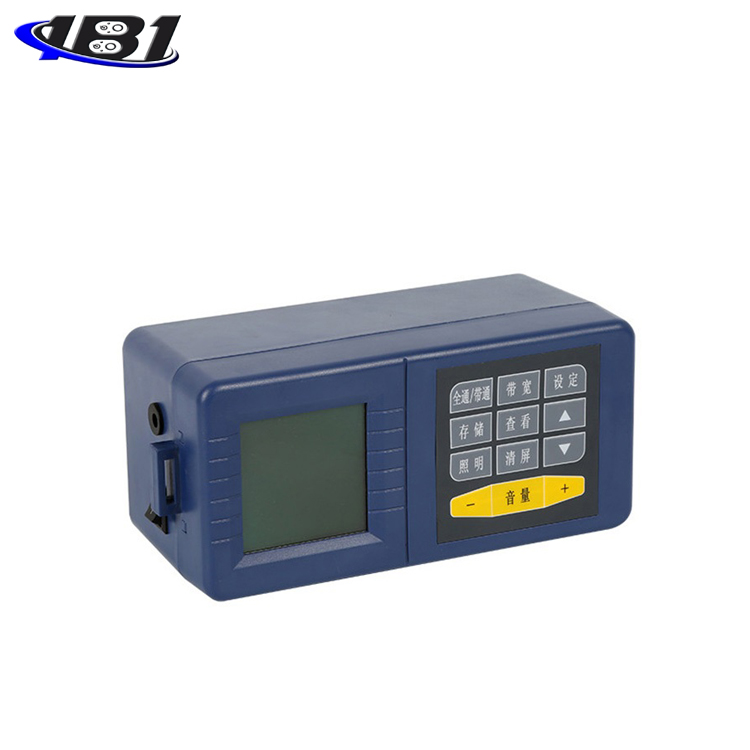
2.3 LCD screen
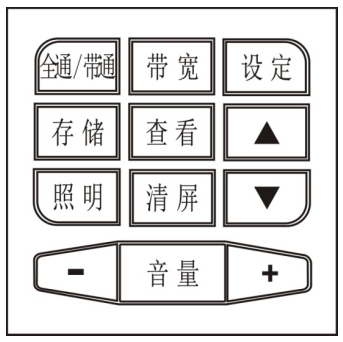
2.3.1 All-pass / Band-pass key: Switch between all-pass and band-pass modes
2.3.2 Bandwidth key: Used to switch bandwidth.
2.3.3 Setting key: used for setting the time, date and backlight brightness.
2.3.4 Storage key: used to store data.
2.3.5 View key: Used to view the saved data.
2.3.6 \" \"Key: Used for upward selection.
2.3.7 \" \"Key: Used for downward selection.
2.3.8 Illumination key: Turn the backlight on or off.
2.3.9 Screen clear key: Used to return.
2.3.10 Volume \"+ \", \"-\" keys: Used to control the volume.
Use and operation
3.1 Preparation before use
3.1.1 Connect Headphone and Pickup Components
3.2 Operation and instructions in use
3.2.1 Put the headset on the desktop or the ground, turn on the meter to enter the measurement interface, the instrument will power on by default and enter \"all-pass \" mode, listen to the ambient noise, or use your feet to gently wipe the ground near the pickup assembly Listen to the sound of friction while observing the dynamics of the bars on the display. If you need to increase the sensitivity, press the right end of the volume key \"+ \", otherwise, press \"-\" until you feel good.
In the process of actual positioning, you must press the handle switch on the remote control component to receive the data, and then release it after storing. If you need to adjust the volume, you can also press the volume keys \"+ \" or \"-\" accordingly.
3.2.2 All-pass / Band-pass: The instrument is in the\"all-pass state\", which means that the leak detector can now receive the sound vibration in the range of 70HZ ~ 3000HZ (70HZ ~ 4000HZ) received by the vibrator assembly. Pass all and zoom in. The sound delivered by the headphones is rich in sound quality and can be felt from low to high frequencies, which means that at this time, the sound of this broad frequency band of the surrounding environment (through ground vibration) can be received. If the environment is quiet, it also has the best analysis of leak detection, but if the environment is noisy, there will be more interference. It is recommended to switch the instrument to work in the\"bandpass\" state, \"full pass / band pass\" The\"\" key is the key to switch the two states of\"all pass\" and\"band pass\".
The instrument is equipped with 7 frequency bands, and the center frequencies of the 7 frequency bands are 100 HZ, 200 HZ, 400 HZ, 800 HZ, 1KHZ, 1.5 KHZ, 2 KHZ (or 3KHZ). In the all-pass mode, these 7 frequency bands are not switchable. In the band-pass mode, these 7 frequency bands can be switched in turn and they are set to narrow and wide bandwidths in order to perform detailed frequency analysis of the water leakage signal.
3.2.3 Center frequency selection (only valid in \"Band Pass \" working state): Press \"\"Key, you can increase the frequency band level one by one, and after returning to the highest frequency band (2KHZ or 3KHZ), it will automatically return to the lowest frequency band (100HZ), and so on. Press \"\"Key can decrease the frequency band level in turn, after returning to the lowest frequency band (100HZ), it will automatically return to the highest frequency band (2KHZ or 3KHZ), and so on.
3.2.4 Bandwidth Selection (Only valid in \"Band Pass \" working state): Observe the bandwidth indicator at the top of the display. If it is in a narrow band \"┃┃┃ \" and needs to be widened, press \"Bandwidth\" Key to switch to \"┃┃┃┃┃ \", and press \"bandwidth \" key again to switch to narrowband \"┃┃┃ \".
3.2.5 Instant freeze on the screen: In band-pass mode, when there is an underline at \"100 \" at the bottom of the screen, it means that the instrument is now receiving the acoustic vibration signal in the frequency band with the center frequency of 100HZ. When the beam is dynamic and stable, It means that the signal strength of the water leakage is this value. If you want to write down this value, you can press \"\"Key, at this time, the receiving frequency band automatically rises to \" 200 \", the underscore jumps to \" 200 \", and the beam column of the original \" 100 \"frequency band is fixed. The corresponding value is also fixed at the top. \"When you need to write down the frequency band measurement, press again \"\"Key, then\" 200\"is fixed,\" 400\"is beating, and so on.
3.2.6 Storage of volume value: In the band-pass or all-pass mode, after confirming the detected value, press the\"\" Storage\"\" button, and the interface\"Memory Channel: 1 \" will appear automatically. At this time, press again \"Save \" key, the data will be saved, if you want to view, press \"View \" key. If you want to store the second time data, you need to press \"Save \" key, then press\"\"The\"\" key selects the second channel for storage. One channel can only store one set of data. The instrument has 9 storage channels. After each channel is filled with one set of data, the first set of data is automatically overwritten when the second set of data is stored. If you do not want to store new data after pressing the\"Save\" key, you can exit by pressing the\"Clear Screen\" key.
3.2.7 Charging: After using for a period of time, the panel LCD display battery becomes low and needs to be charged. The instrument is equipped with a special charger and a dedicated charging jack on the side of the instrument. When charging, connect the charger to 220V mains power, insert the charging output plug into the charging hole, and the indicator light on the charger lights up red, which indicates the start of charging. Turn green when finished.
Fourth, precautions for use
4.1 The leak detector is a precision instrument. Although it is an external field operation, its tolerance has been noted, but the operator should take care to avoid unintended collisions, wetness, scratches, and broken wiring. Special attention should be paid to the vibrator. Do not drop it from a high place, and the surface of the instrument should not be stressed or damaged. The special outer packing box is provided with positioning pads. When packing, all parts must be placed in place. When closing the box, all parts must be straightened to avoid heavy pressure. Pay attention to cleaning, no corrosion and avoid excessive humidity and temperature during storage.
Five, packing list
|
1 |
Host |
1 |
|
2 |
Remote control components |
1 |
|
3 |
Probe |
1 |
|
4 |
Probe post |
1 |
|
5 |
Probe pin holder |
1 |
|
6 |
Pickup components |
1 |
|
7 |
headset |
1 |
|
8 |
strap |
1 |
|
9 |
charger |
1 |
|
10 |
Manual |
1 serving |
|
11 |
Certificate of conformity |
1 serving |
|
12 |
Warranty Card |
1 serving |
|
13 |
Aluminum case key |
1 |
|
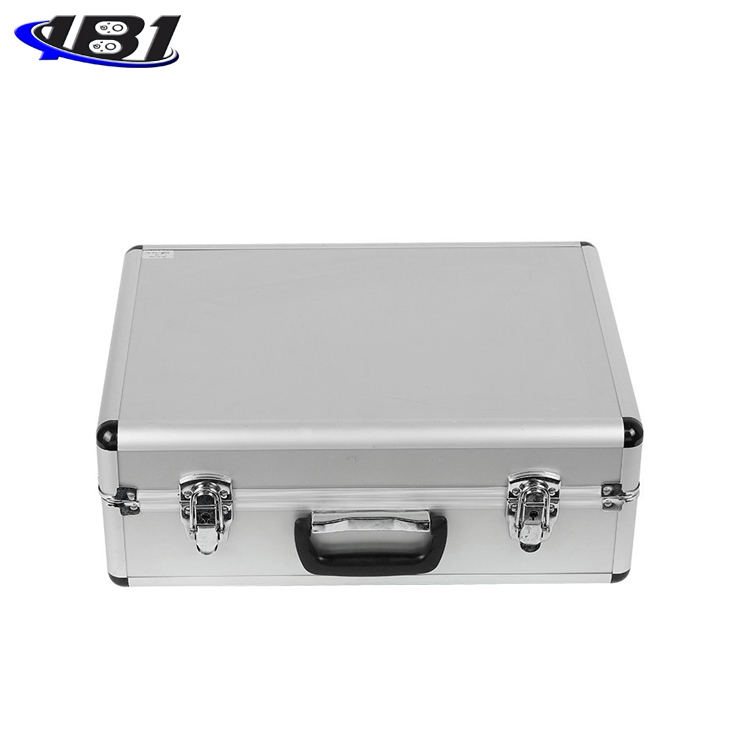
Aluminum Carrying Case |
1 |
|
|
15 |
Desiccant |
1 bag |