support hotline
0577-57572522
I. Overview
1.1 Main uses and scope of application
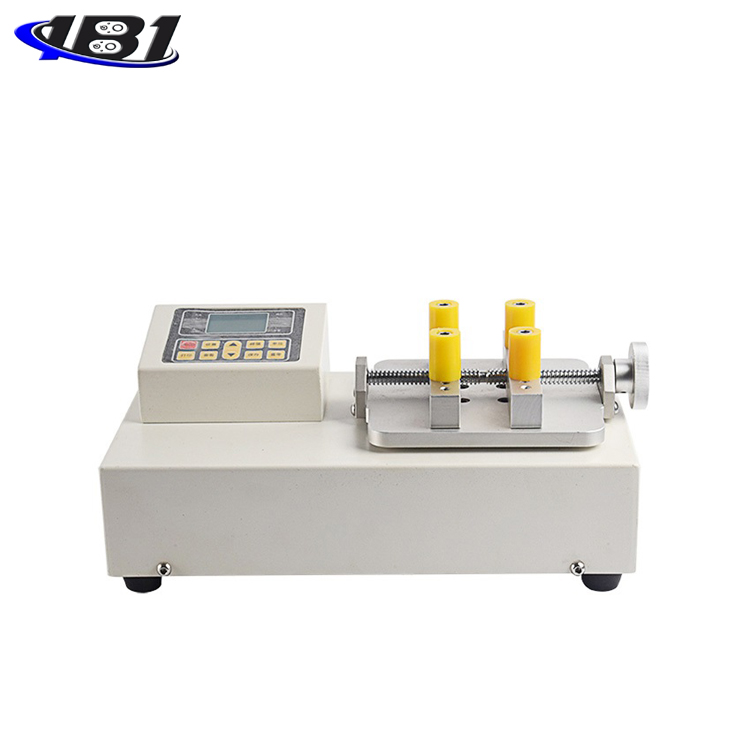
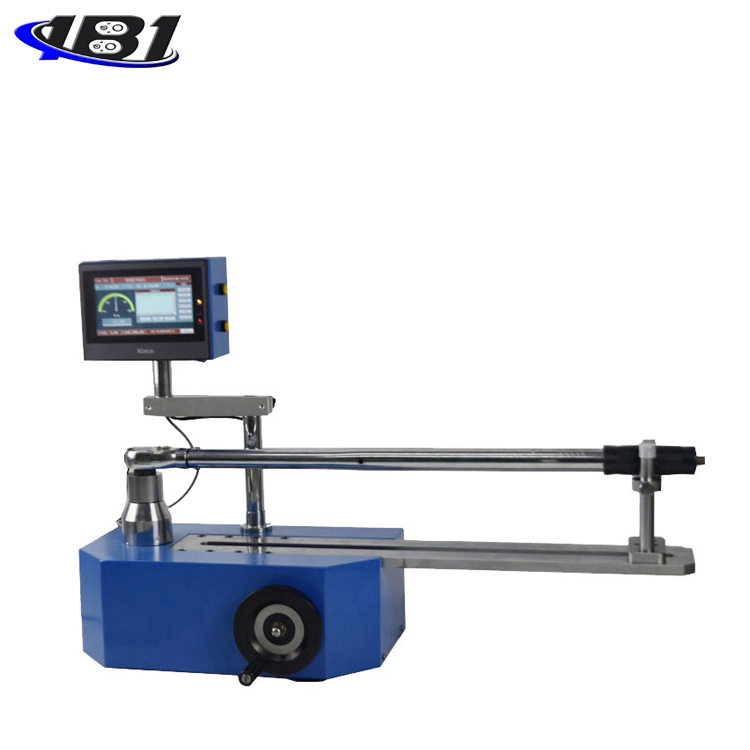
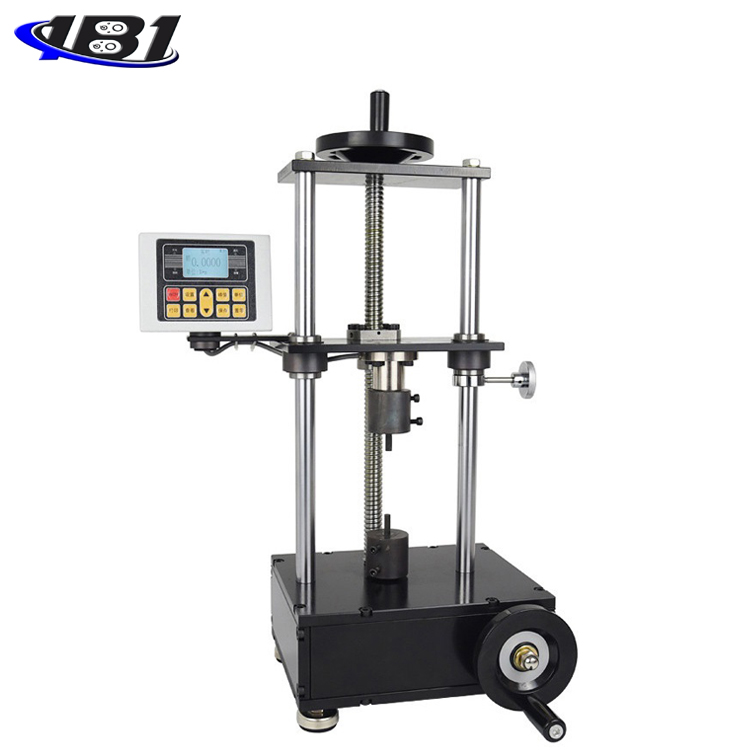
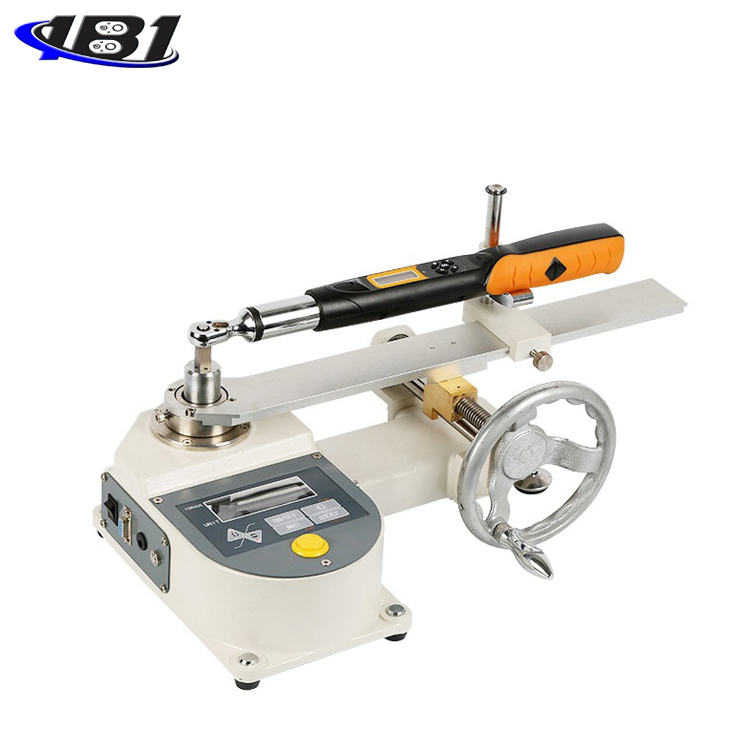
ANBH torque wrench tester is a special equipment for testing torque wrenches and torque drivers. It is mainly used to inspect or calibrate torque wrenches, preset torque wrenches, and pointer torque wrenches. Widely used in electrical manufacturing, machinery manufacturing, automotive light industry, professional scientific research and testing industries. The torque value is displayed by digital instruments, which is accurate and intuitive.
1.2 Product Features
This instrument is a digital torque wrench verification instrument specially designed for calibrating or adjusting torque wrenches. It has the following characteristics:
(1) Multiple units can be selected
Units of measurement include Newton units (N.m), metric units (kgf.cm), and American units (lbf.in).
(2) Two measurement modes
The instrument can switch between real-time and peak mode.
(3) Upper and lower limit settings
The upper and lower limits of the instrument can be set. When the set value is reached, the buzzer will alarm.
(4) Data saving function
This instrument can store 100 sets of measurement data.
1.3 Variety specifications
|
specification |
ENBH-20 |
ENBH-50 |
ENBH-100 |
ENBH-200 |
ENBH-500 |
|
Max |
20N.m |
50N.m |
100N.m |
200N.m |
500N.m |
|
Minimum resolution |
0.001 |
0.001 |
0.001 |
0.01 |
0.01 |
|
Precision |
± 1% |
||||
|
Unit switching |
N.m, Kgf.cm, Lbf.in |
||||
|
power supply |
Input: AC 220v Output: DC 12V |
||||
|
Overall dimensions mm |
299 * 299 * 242 |
772 * 400 * 276 |
1142 * 553 * 360 |
||
|
Operating temperature |
5 ℃ ~ 35 ℃ |
||||
|
Transport temperature |
-10 ℃ ~ 60 ℃ |
||||
|
Relative humidity |
15% ~ 80% RH |
||||
|
working environment |
No vibration source and corrosive medium around |
||||
|
Weight (Kg) |
12 |
27 |
43 |
||
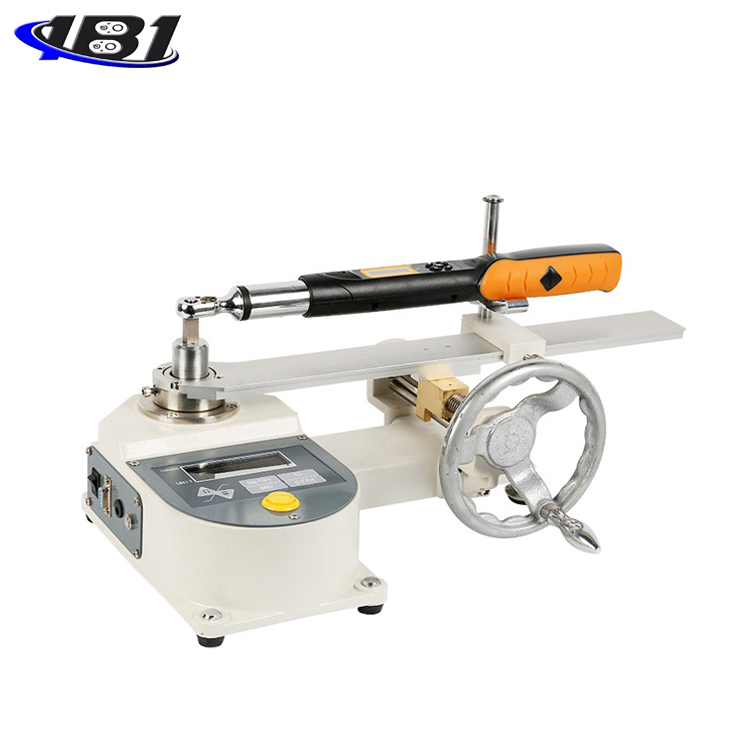
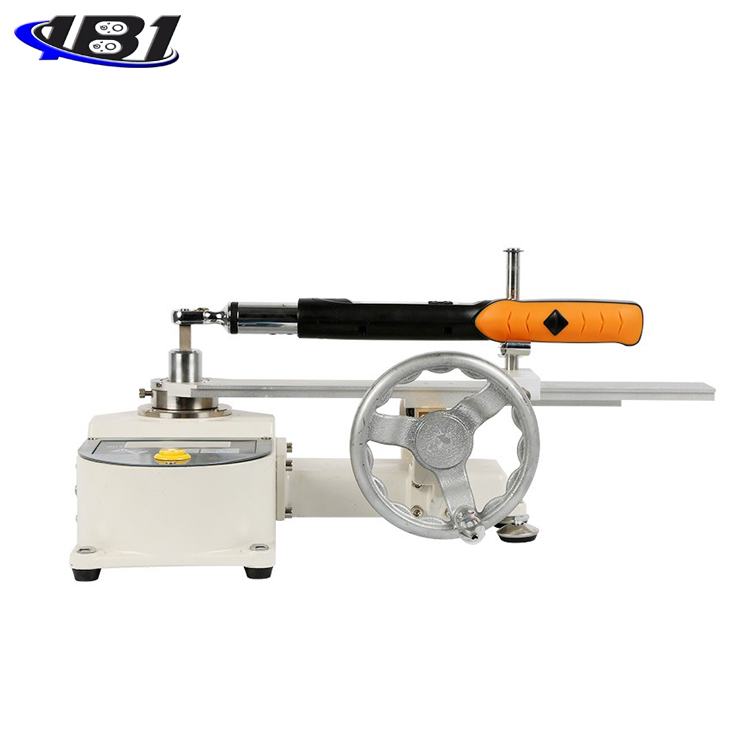
Overall product structure
2.1 Outline structure
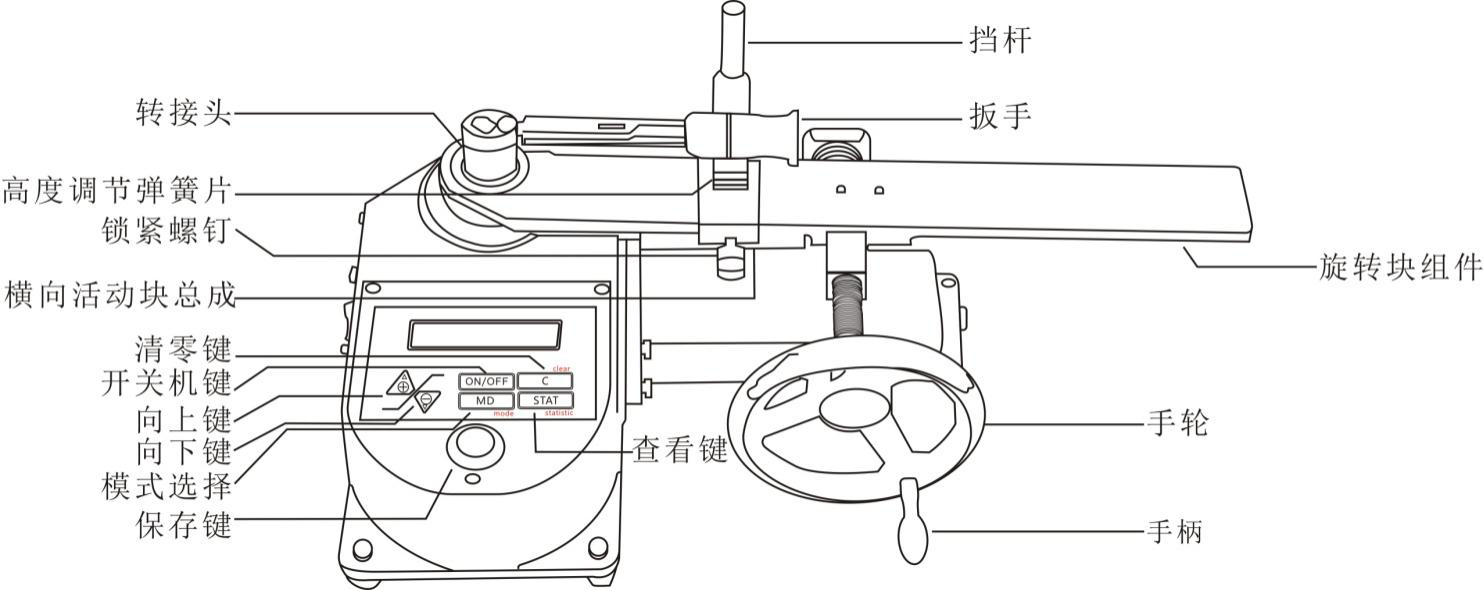
2.2 Key introduction
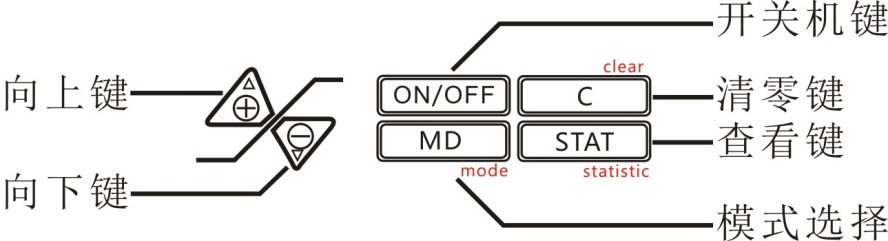
2.2.1 Up key: Press this key on the measurement interface to rotate the measured data 180 °; in the setting interface, there are functions of upward selection and increase of values.
2.2.2 Down key: In the setting interface, there are functions of downward selection and displacement.
2.2.3 Power on / off key: Power on and off functions.
2.2.4 Clear key: The measurement interface has the function of clearing data, the setting interface has the return function, and the save data view interface has the function of clearing all data.
2.2.5 View key: In the measurement interface, there is a function to view the saved data.
2.2.6 Mode selection: In the measurement interface, press this key to switch between peak mode and real-time measurement mode. Press and hold this key for 6 seconds to enter the setting interface. This key has a save function in the setting interface.
Function introduction
3.1 Setting items:
3.1.1 Under the measurement interface, press and hold \"MD \" for 8 seconds to enter the setting interface, as shown in the figure below:
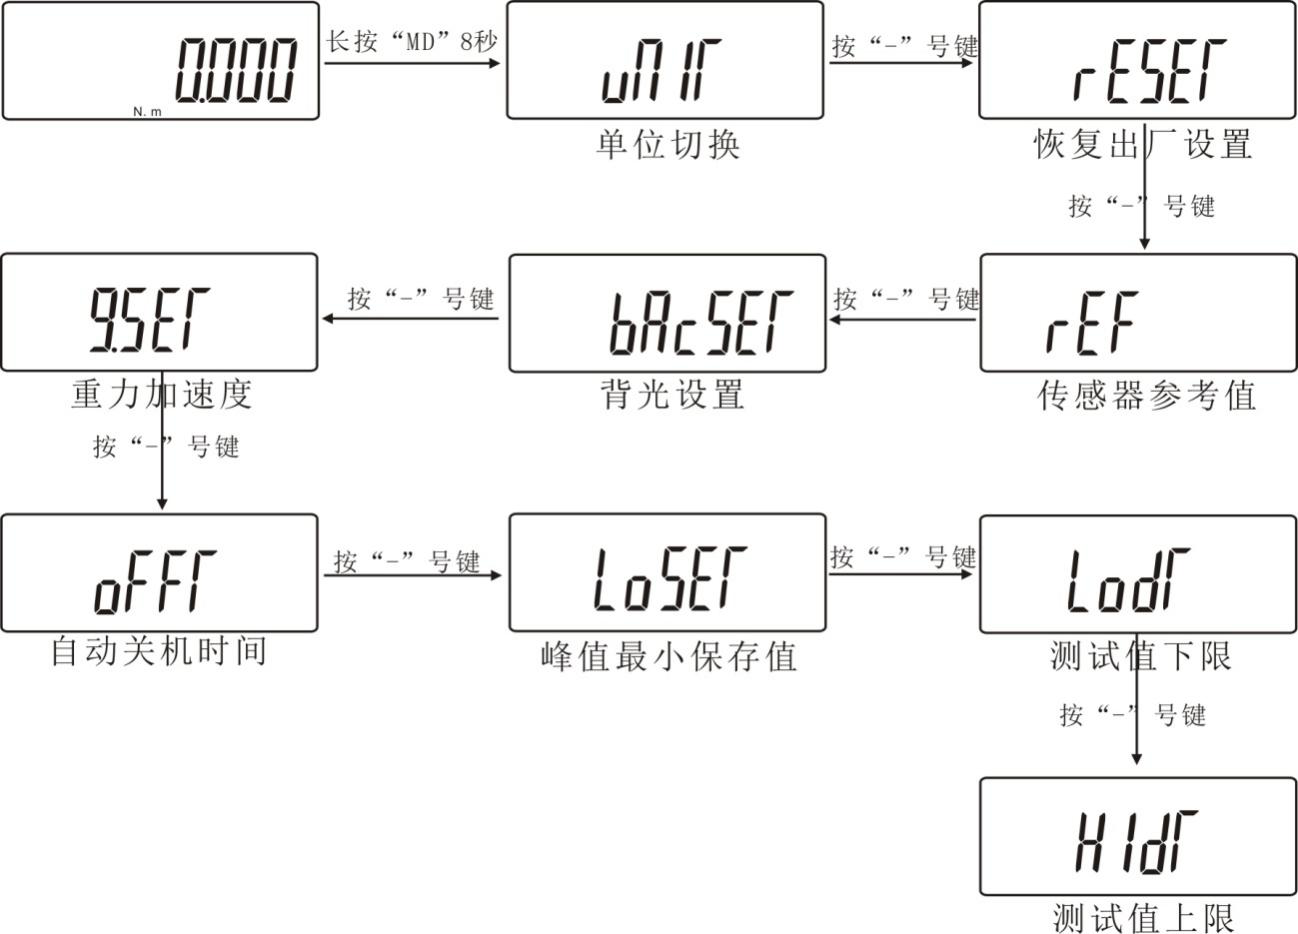
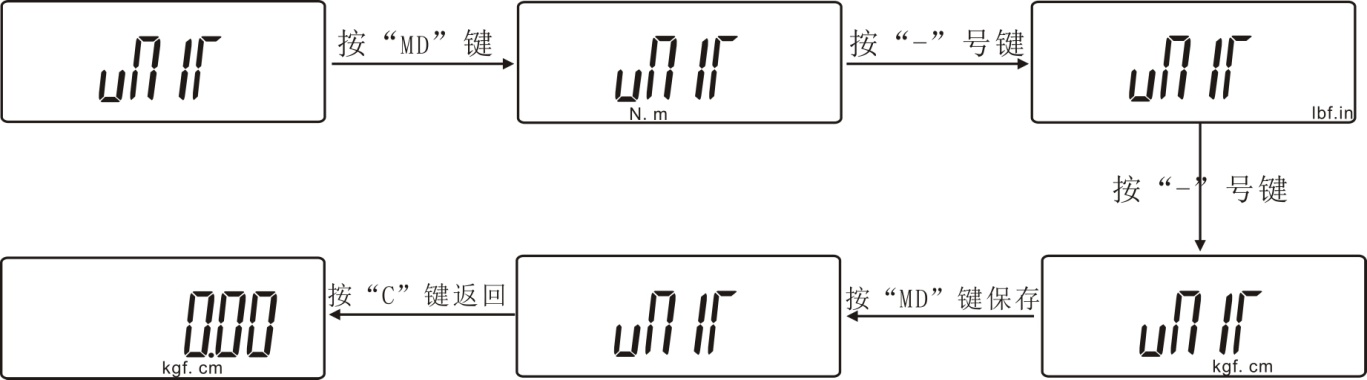
 (UNIT) Unit setting: The instrument can switch 3 units. After entering the unit setting interface, press \"+ \" or \"-\" to select the unit, as shown in the figure below:
 (RESET) Restore factory setting function: Under this setting item, press \"MD \" key to restore the factory setting and the instrument will automatically shut down. If you use the machine to restart.
 (REF) Factory setting value: has nothing to do with the user.
 (BACSET) Backlight function setting: Under this setting item, use \"+ \" or \"-\" key to select, select \"
 (YES) \"Backlight is on, select \"
 (NO) The backlight is turned off. After selecting, press the\"MD\" key to save and return to the setting interface.
 (G.SET) Gravity acceleration setting: The user can set the gravity acceleration value according to the location of the area. The default value is 09.800.
 (OFFT) Automatic shutdown time setting: Under this setting item, use \"+ \" and \"-\" keys to select, you can set automatic shutdown from 0 minutes to 9999 minutes, or you can set \"0000 \" Does not shut down automatically. If you choose not to shut down automatically, press \"MD \" key to finish setting after returning to the setting interface. The instrument is set to 10 minutes by default.
 (LOSET) Peak minimum save value: The minimum peak save value. In peak mode, when the current value is less than this value, the peak value will not be saved. The default minimum save value of the peak value of this instrument is 0.
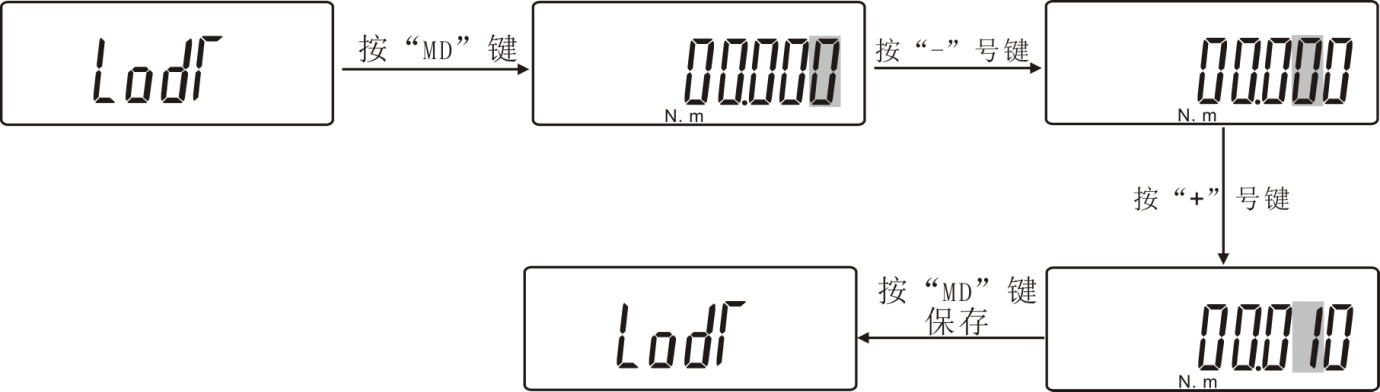
 (LODT) Test value lower limit setting: Set the lower limit of the test value. The lower limit defaults to 0. Below the lower limit is out of range, \"MIN \" is displayed. The lower limit of the instrument is 0 by default. If you want to reset the lower limit, under this setting item, use \"+ \" and \"-\" keys to set. Press \"MD \" key to save and return to the setting interface. As shown below:
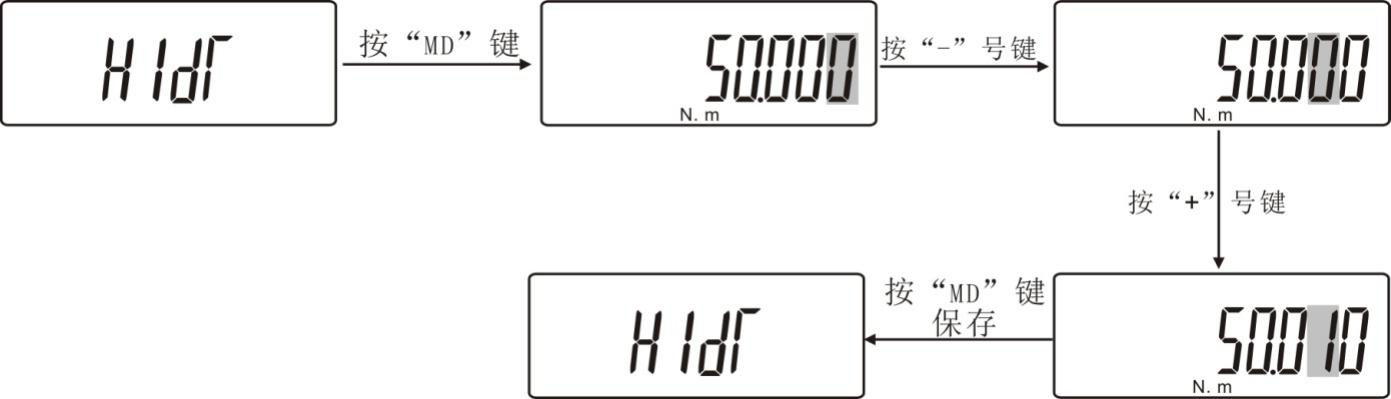
 (HIDT) Test value upper limit setting: Set the upper limit of the test value. Above the upper limit is out of range, \"MAX display \", the default upper limit value of this instrument is full scale. If you want to reset the upper limit, under this setting item, you can use \"+ \" and \"-\" keys to set. Press \"MD \" key to save and return to the setting interface.
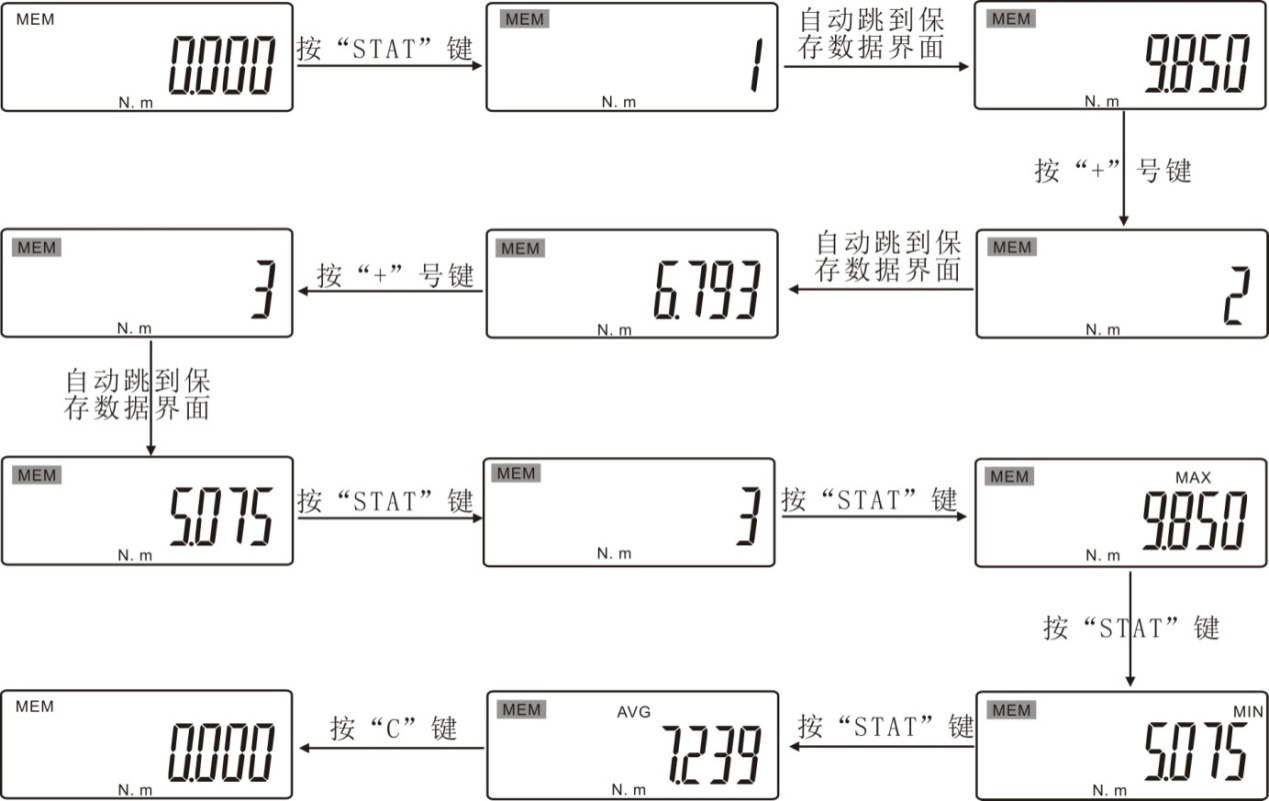
3.2 View saved data
After saving the measurement data, press the\"\" STAT\"key. The screen displays\" 1\", which indicates the first set of data stored. After that, the screen automatically displays the saved data. Press the\" +\"key again and the screen appears.\" 2 \"Will automatically display the saved second set of data; continue to press the\"\"+ \" key, the screen will automatically display the saved third set of data, and then press the\"\" STAT\"\" key, the screen will display\"\" 3 \", indicating storage The total number of data sets, press the\"\" STAT\"key again to display the maximum value of the saved data sum, then press the\"\"STAT\"\"key, the minimum value of the saved value sum will be displayed, and then press\"\"STAT \" Press the key to display the average value of the sum of the saved values. After that, press the\"C\" key to return to the measurement interface. As shown below:
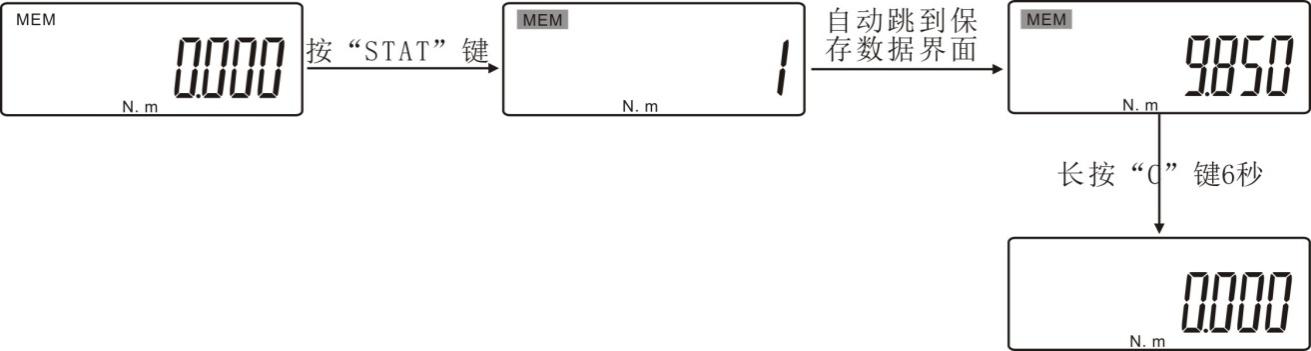
3.3 Clear data
After pressing and holding the\"\" C\"key for 6 seconds in the data save interface, all the saved data is cleared and it automatically returns to the measurement interface. As shown below:
Fourth, the calibration method
4.1 Calibration conditions
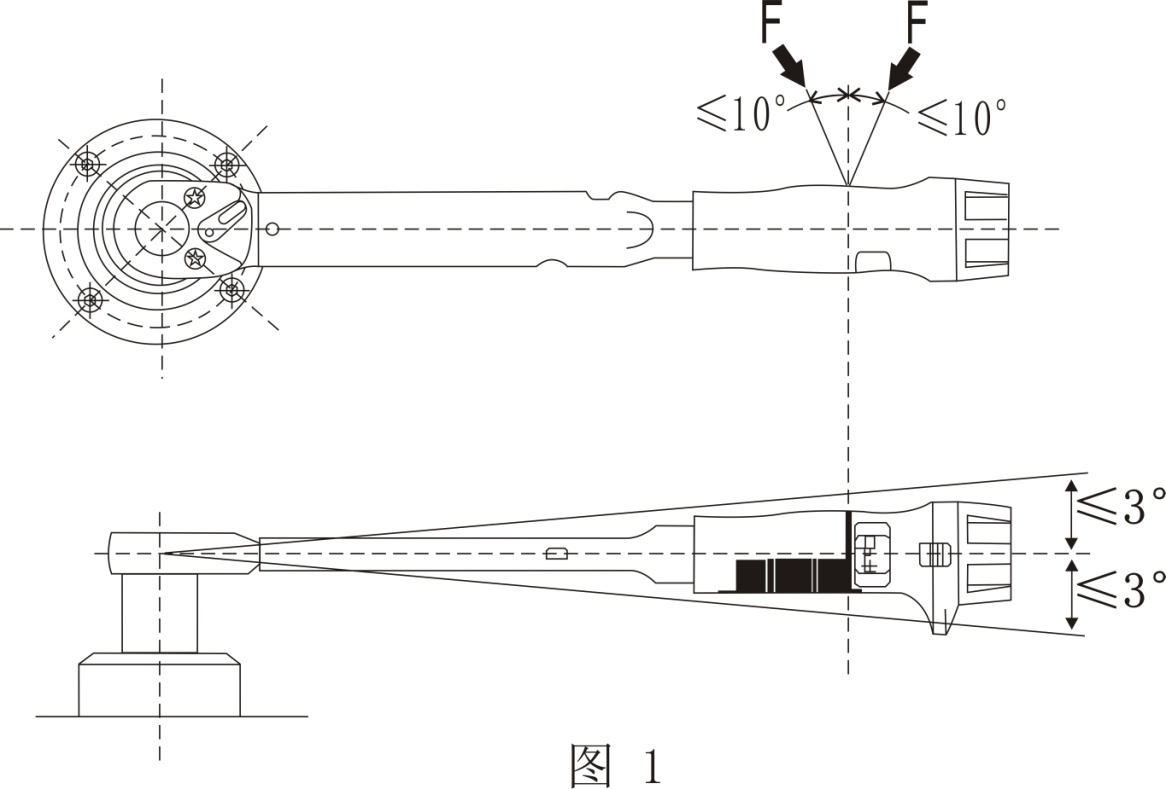
4.1.1 Before starting the torque wrench calibration, please check the following.
(1) Place the torque wrench verification instrument on a stable workbench.
(2) For direct-reading torque wrenches, when reading measurement data, the line of sight must be perpendicular to the dial.
(3) For a jump-type torque wrench, apply the maximum torque of each model 5 times in both directions for test operation to perform preheating operation.
(4) For direct-reading torque wrenches, load the maximum torque of each model once in both directions as a warm-up operation, and ensure that the pointer or digital display shows\"0\" after loading.
(5) Apply a load within the range specified in Figure 1 at the center of the handle or at the marked load point.
4.2 Precautions for calibrating torque wrench
(1) For a jump-type torque wrench, load the initial torque to 80% of the target torque, and then apply the remaining torque slowly and evenly. (The last 20% takes 1-3 seconds.) The pre-set torque wrench must start at a low level and then adjust to the target torque. (Do not drop from a high level to the target torque.)
(2) For direct-reading torque wrenches, gradually apply the torque to the target torque, taking care not to exceed the target torque. If you accidentally exceed the target torque, release the torque to zero and restart the process.
V. Operation steps
5.1 When using the instrument for the first time, the lateral slide block and handle must be installed.
5.2 Slide the lateral movable block assembly into the rotating block assembly and fix it in a certain position with the locking screw.
5.3 Rotate the handle into the handwheel.
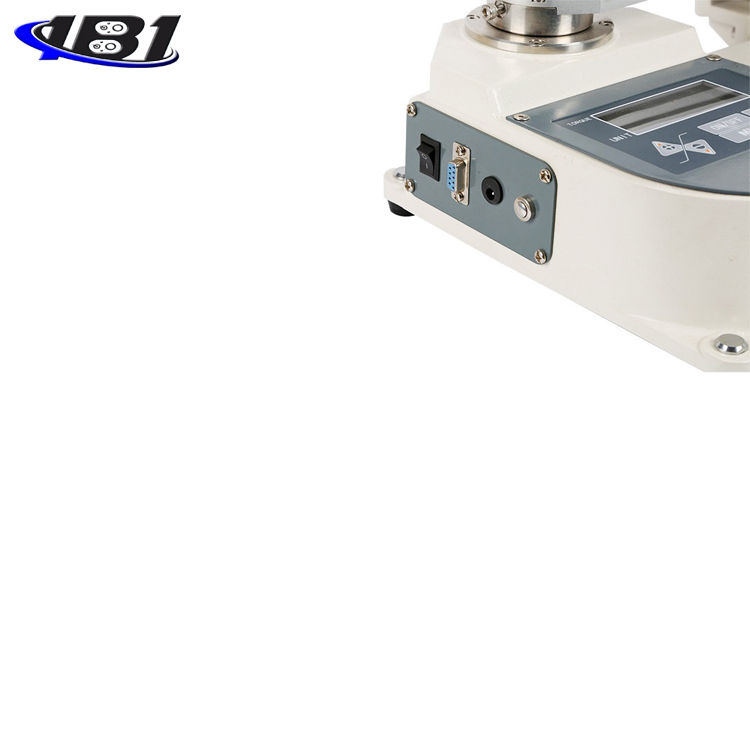
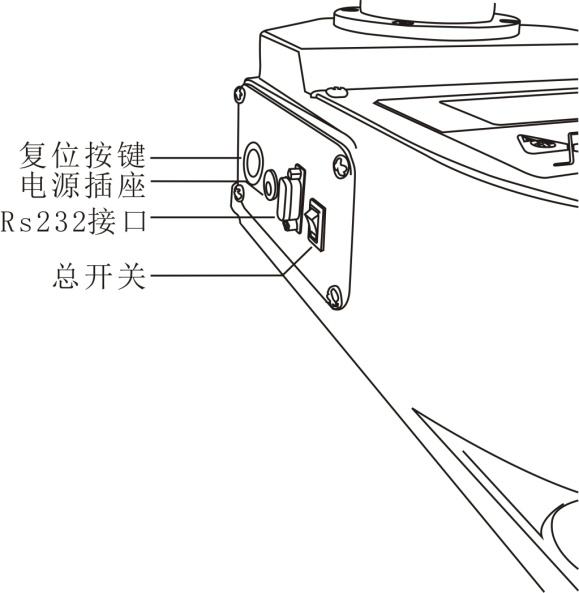
5.4 Plug in the power cable.
5.5 After turning on the main switch, press the power button.
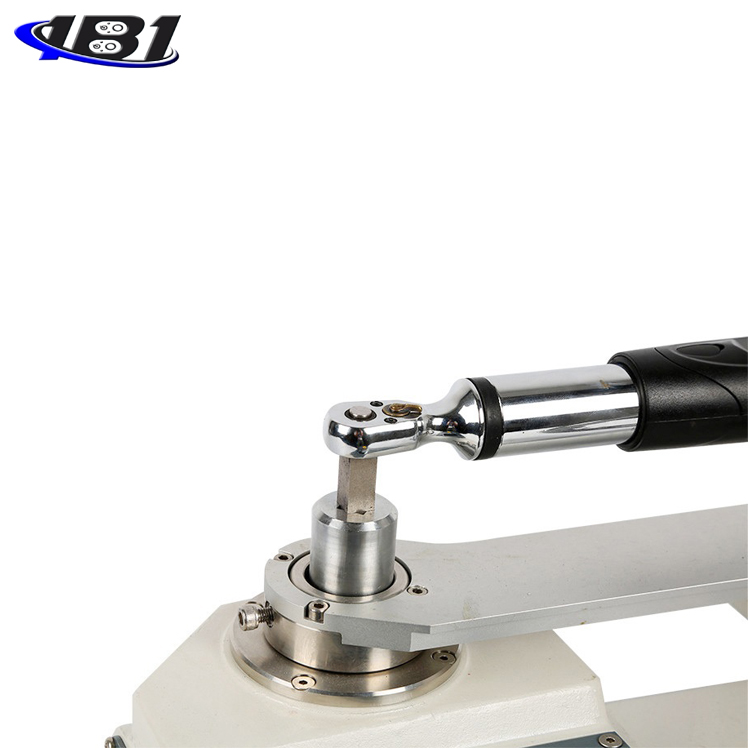
5.6 Put the torque wrench into the adapter.
5.7 Adjust the height adjustment springs and length adjustment nuts to a suitable position, and then reset the display to zero.
5.8 Select the desired unit and measurement mode
5.9 Shake the handwheel to start the test until the instrument clicks and completes the test.
Six, matters needing attention, maintenance and repair
6.1 Do not test the torque with overload. Be sure to test within the allowable range of the instrument, otherwise the instrument will be damaged.
6.2 Do not strike or scratch the display screen with sharp objects such as heavy objects or sharp objects.
6.3 Do not use the torque wrench tester in the place where water, oil or other liquids are splashed. Store the torque wrench tester in a cool, dry and vibration-free place.
6.4 Please use the matching power adapter to charge, otherwise it will cause circuit failure and even fire.
6.5 Insert the AC power adapter into the socket before using it. A loose plug may cause a short circuit and cause an electric shock or fire.
6.6 Please do not pull out or insert the plug with wet hands, otherwise it may cause electric shock.
6.7 Please use a soft cloth to clean the machine, immerse a dry cloth in water soaked with detergent, wring dry, and then remove dust and dirt. Do not use chemicals that emit easily, such as volatiles, thinners, alcohol, etc.
6.8 Handle gently during use and handling.
6.9 Do not disassemble, repair or modify the machine yourself. These actions may cause permanent failure of the instrument.
6.10 Please contact the original place of purchase or our company if any trouble occurs.
Packing list
|
1 |
Torque wrench calibrator |
1 set |
|
2 |
Manual |
1 serving |
|
3 |
Adapters |
Look at the packing list |
|
4 |
Power adapter 12V |
1 |
|
5 |
Certificate and warranty card |
1 serving |
|
6 |
Inspection certificate |
1 serving |
|
7 |
Desiccant |
1 package |